Compact, Backup and Restore Tool
To access this group of Spectra utility programs, click on the Windows Start button – Programs – Spectra – Compact or Backup Data Files.
Compact
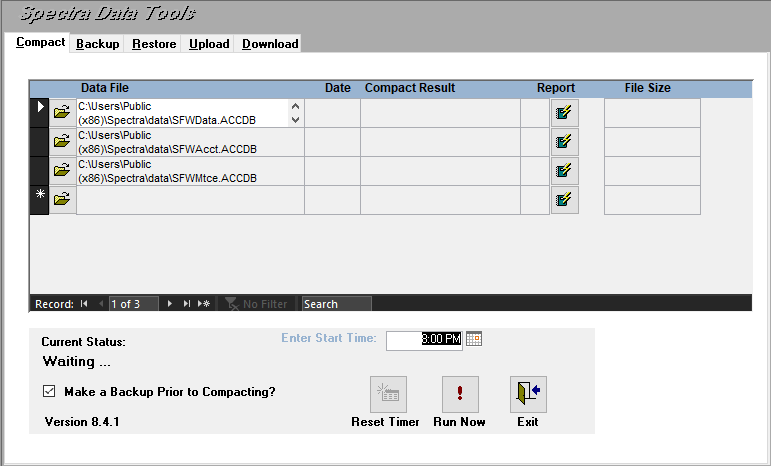
• You should compact and back up your data files daily.
• All users must be logged out of SPECTRA
• “Make a Backup Prior to Compacting?” Is Checked by default. It is important to always make a backup prior to compacting. This gives you a restore point if something goes wrong during the Compacting process.
• Click on the Run Now button to start the compact immediately.
• When it has completed, you should have green happy faces beside all three files. (If you have any red frowning faces, contact Spectra Support immediately!)

• If you get an error message when running the compact program, print the report and contact Spectra Support immediately. Do not continue to process any transactions!!
• The Compact and Backup Tool it will detect and add an existing SFWTran.ACCDB or SFWRecv.ACCDB file, if they have not already been added.
Schedule Compact and Backup
You can choose to run the Backup and Compact process outside of your normal business hours.
• Enter Start Time: You may set the compact program to run at any time in the next 24 hours. If you wish to use this option, do not exit the program. You may minimize it, but the program must be open at the scheduled time to run.
• Once an automated compact/backup is run, the tool will not run this action a second time the next day unless the tool is closed / re-opened or you click the Reset Timer button. For example:
• At 5pm Friday you set the compact to run at 8pm
• At 8pm Friday the compact runs automatically
• Unless someone clicks Reset Timer or closes/opens the tool, the compact will not run again Saturday at 10pm

*Note: It is highly recommended that a backup is created prior to compacting. If the compact process encounters database corruption, data loss could occur. Having a backup prior to compacting might allow the Spectra developers to prevent the data loss.
Backup
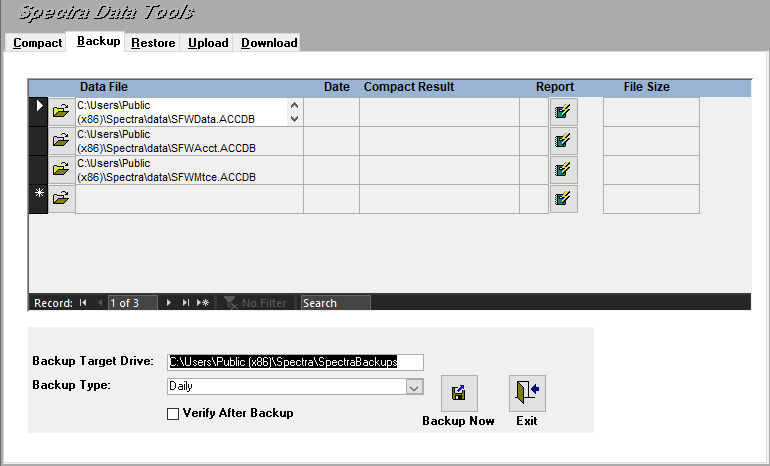
Backing up your files is very important. This is the most inexpensive form of insurance you can have!
• Compact and back up your data files daily.
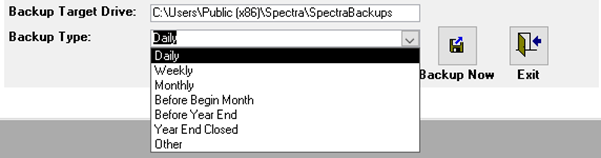
• Under the Backup Tab, you have the option to indicate a “Backup Type” This defaults to Daily, however, if you are making a backup for Weekly, Month End, or before running big processes such as Begin Month Charges or a Permanent Year End Close, you can change the type:
• All users must be logged out of SPECTRA
• The SPECTRA data files that need to be backed up are SFWData.ACCDB, SFWAcct.ACCDB, and SFWMtce.ACCDB. (SFWTran.ACCDB and SFWRecv.ACCDB if applicable). Drill down on the binoculars button to select your files for backup if they do not already appear.
• Backup Target Drive: This will default to the same directory where the Spectra database files are stored or enter another drive letter to which you will be backing up your files. If you use a CD for your backups, you must first backup to your hard drive and then burn the backup file to the CD. All backups done by Spectra’s backup programs will be called "Backup_YYYY_MM_DD.zip".
• You can enter a default location for your backups. Go to System Tasks – Spectra Utilities – Configuration File (Extras) to enter your desired backup location
• Verify After Backup – Select this option to help confirm the validity of your backup.
• Backup Now: Click on this button to start your backup now. As you may be backing up to diskette we cannot automate this to start at a certain time.
• Upload: Occasionally we may ask you to send in a backup of your files. You can use the Upload tab to backup and upload your files or upload an existing backup.
Backup Schedule
Your data storage space can be valuable real estate causing you to question exactly how long you should keep your backups. We recommend the following cycle:
At the end of the month, make a month-end backup, when you make the month-end backup for the next month delete the prior month’s daily backups, keeping the month-end backup from each month. At the end of the year, you can delete the month-end backups from the prior year. (For example: January 1 – January 30 make a daily backup. On January 31, verify that January is in balance, make sure that tenant ledgers are in balance and create a month end backup. Repeat the same process for February. When you make the month end backup for February, delete the daily backups from January 1 – January 31. Repeat this process every month. At year End, create a backup prior to running the permanent Year end. Verify that all buildings and tenants are in balance and create a Year End backup. You can then delete the month end backups from the previous year. When you complete the last backup of 2019, you would then go back and delete the month end backups from 2018.)
Note: We recommend the use of an off-site storage solution to store your backups.
Important Note Regarding Backups
The backup will default to the Backup folder in the Spectra Program folder. You can change this location however this is not recommended.
Restore
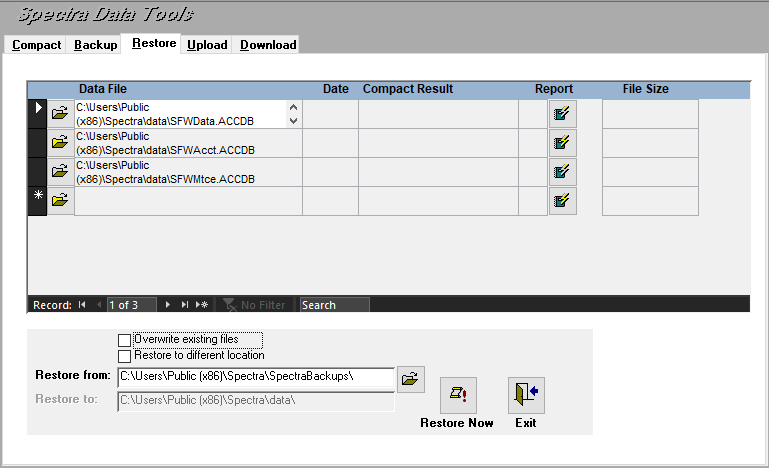
You have two options to consider:
1. Overwrite existing files – Most of the time you will select this option.
2. Restore to different location – Most of the time you will not select this option.
Restore from:
This will default to the path last entered as the "Backup Target Drive" on the Backup tab. If you are restoring from a different drive letter enter the correct path and the file name here. All backups done by Spectra’s backup program will use the following naming convention:
"Spectra_For_Windows_ReleaseVersion__YYYY_MM_DD_HH_MM.zip"."Spectra_For_Windows_ReleaseVersion__YYYY_MM_DD_HH_MM.zip".
Upload/Download
Sometimes it may be necessary to send your data files in to support for research or repair:
Upload
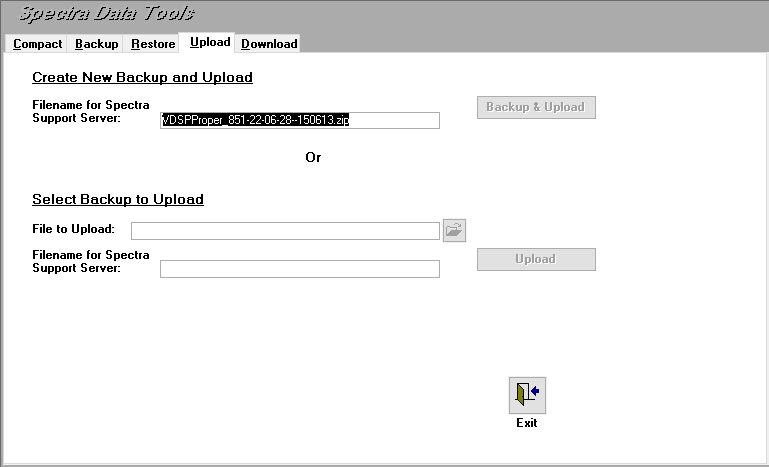
• Go to Start > All Programs > Spectra > Compact or Backup Data Files > Upload, then either create a new backup or upload an existing backup.
• If you do not already have a backup that contains the required data, log all users out of Spectra then click the Backup and Upload button
• If you already have a backup made with the required data, click the folder icon on the File to Upload line, choose the backup, and click Upload
Download
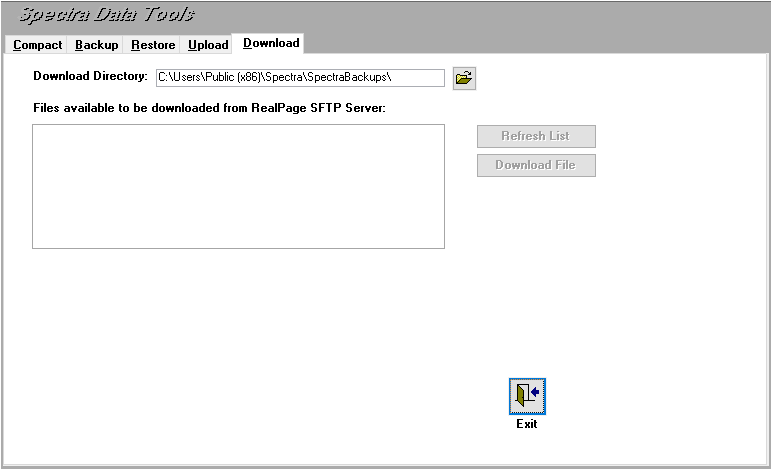
1. Click the Download Tab, Click Refresh List
2. Highlight the file and click Download File
3. Ensure everyone is logged out of Spectra
4. Click the Restore tab
5. Check the 'Overwrite existing files' check box
6. Change the 'Restore From' path to the location and file name of the file
Note: This is the file you downloaded in step 1
7. Click Restore Now. After the progress bar is finished, you will be able to log back into Spectra and see your repaired data.
* If the following text appears, this means that you have not entered your Secure FTP Credentials
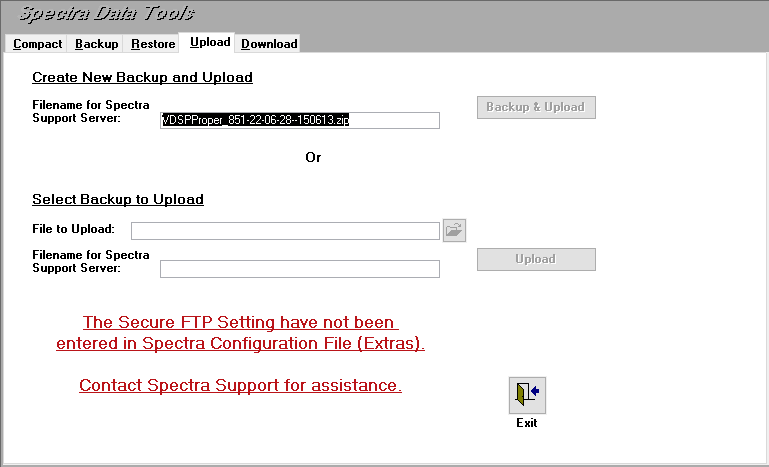
Please contact Support for assistance in setting up the Secure FTP Credentials.