Basic Statement Definiton.
Creating Financial Statment Row Definitions
To edit or create a new financial statement row definition, go to the navigation pane under System Tasks, click on Financial Statement, and then under Start a Task click on Row Definitions.
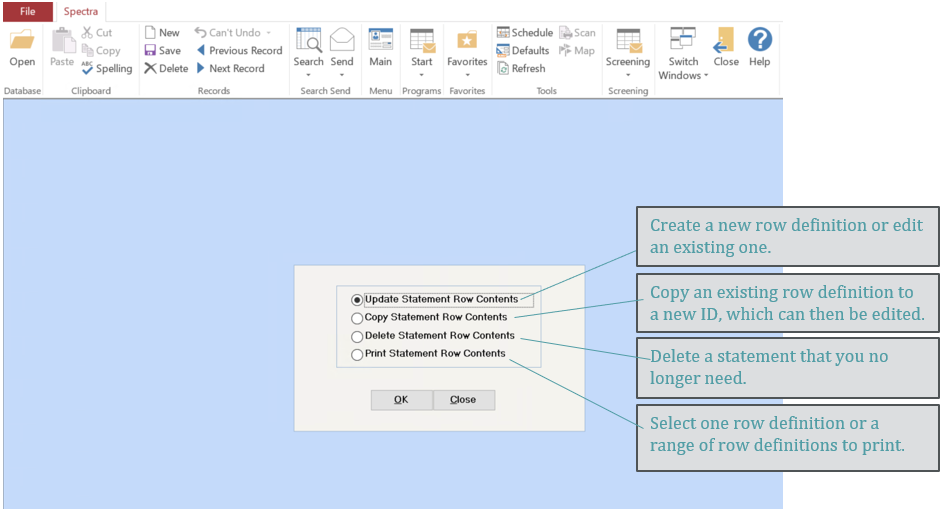
Update Statement Row Contents
To set up a new financial statement row definition, or edit an existing row definition, you will need to select “Update” from the list.

ID
Click on combo box to select from list of existing row definition ID’s, or type in a unique ID for a new row definition to be added to your list.
Name
Enter name to print at the top of the financial statement, e.g. Income Statement, Balance Sheet, Cash Flow Statement, etc.
Date Format
Select the date format from the drop down menu. For balance sheets, you will probably use “As At mmmm d, yyyy”, for all others use “For the xx Months Ending mmmm d, yyyy.”
As soon as you press the
Append Screen
Seq.No
The sequence number determines the order of the program’s processing. The program automatically assigns sequence numbers in increments of 10.
E.g. To insert a line before Sequence No. 50, you would put your cursor on Line 50, click on Insert a Line, and the program would insert Sequence No. 49, and wait for your instructions.
Type
Several Line Types are available:
Description
Description entered here will print on the financial statement if Print Row is selected. Only available for line types AS, BB, BS, ES, HC, HP, T1 – T9.
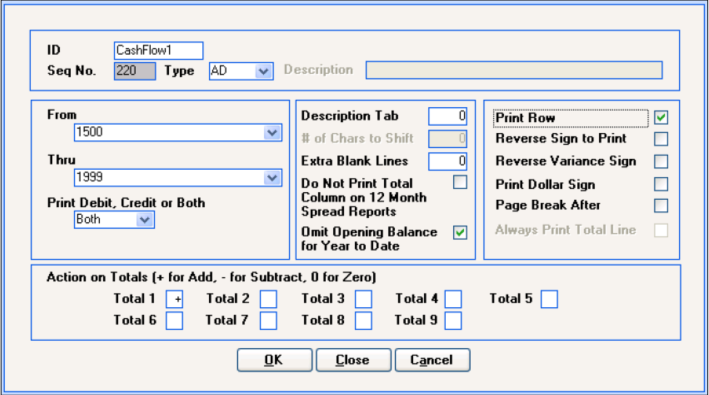
From-Thru
Enter G/L account range of accounts to be included in Line Types AD, AS, BB, BD, BS, ED, and ES.
Print Debit, Credit or Both:
Default is both. In the account range indicated above, you have the option of selecting only those accounts with debit balances or credit balances. Normally, you would specify both. You might want to use this option to create an analytical tool to highlight accounts that have an unusual balance (e.g. expense accounts with credit balances.)
There are also options for “over var” and “under var” to be used with the Budget Exceptions financial statement. Details on this type of statement set up are covered in the second seminar, Advanced Financial Statements. More information can also be found in the help files.
Description Tab:
Default is zero. Any number entered will be the number of spaces that the description will be moved to the right. You might use this to indent the details of a category under a heading.
# of Chars to Shift:
Reserved for future use – it is not functional at this time. Use Description Tab.
Extra Blank Lines:
Default is zero, but program will insert the number of blank lines entered after the current line is printed. Alternately, you can enter sequence #’s with the type of BL.
Do Not Print Total Column on 12 Month Spread:
Under some circumstances the 12 month spread reports would create a meaningless total (i.e. a total of the YTD Totals). Select this option to omit these totals.
Omit Opening Balance for Year To Date:
This option is used when creating cash flow statements. It will exclude the opening balances so that you can use any financial statement report names that include Annual Budget or Total Last Year columns to show only the net amount for the period. Note - It also replaces the need to enter a BD, an ED, and a T1 for each range of g/l accounts, which was required in previous versions of SPECTRA.
Print Row:
The program defaults to print all rows. It may be used to suppress the printing of a line inserted for calculation purposes. Program will calculate this line, but you have the option of whether to print it or not. This is useful if you are collecting amounts from various G/L accounts, but only want to print one total. You would suppress the printing of the AD lines and only print the Total line.
Reverse Sign to Print:
If this option is not selected, the financial statements will show the correct sign from an accounting perspective, i.e. income will show as credits (-) and expenses as debits (+). Particularly on income statements, you may wish to reverse the sign on the AD, AS, and T1-T9 lines for any revenue accounts.
Reverse Variance Sign:
Used by Report Names comparing Actual amounts to Budget amounts. The default is that a negative variance indicates that the Actual amount is greater than the Budget amount. If you would like to show the variance as a positive amount, you will need to put a check mark in the Reverse Variance Sign box on the row definition detail line.
Print Dollar Sign:
Self-explanatory
Page Break After:
If you select this option, the next line will start on a new page. For example, used on the UD line of a Balance Sheet after the Total Assets to start the Liabilities on a new page.
Always Print Total Line:
If a total equals zero, the program will only print this line if you have ticked this field.
Totals 1 – 9:
This is probably the most difficult concept of the financial statement row definition program, but once you understand how it works, you will be creating financial statements with ease! If you try to visualize a columnar pad, and how you might lay out sub-totals and totals on such a pad, this may help your understanding of the total columns concept:
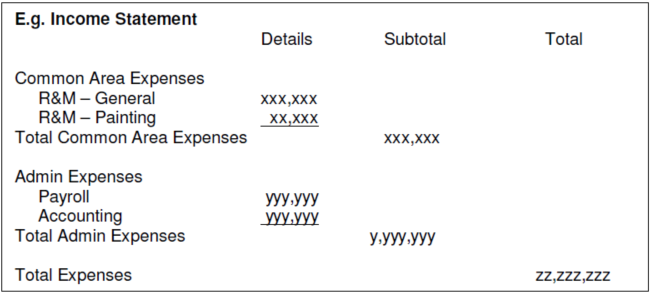
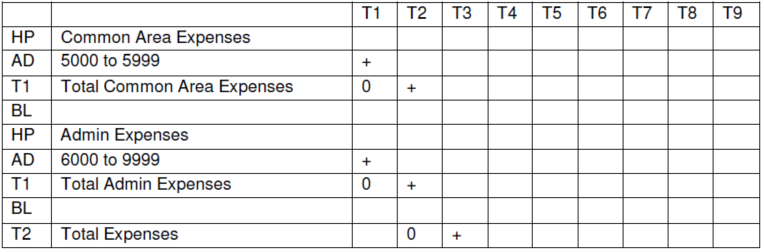
For example, Total 1 has been used as the lowest level of sub-totals. The Common Area Expenses were itemized using an AD line, then sub totaled and transferred to another Total “bucket” using a T1 line with a 0 (zero) in Total 1 and a + in Total 2. This transfers all amounts stored in Total 1 (i.e. column 1) to Total 2 and leaves Total 1 empty to start accumulating other amounts, i.e. the Admin Expenses. The second level of totals, the T2’s, are then added together to come out with the Total Expenses. This is what it would look like in your row definition:
When building your calculations, your options are to Add, Subtract, or enter a 0 to print the total collected to this point and zero out the amounts in that Total column. The norm is to add amounts to a total column, e.g. Total 1, and then use a T1 line to print those totals.
Cumulative?:
This option will appear for T1-9 lines. It is used to create a running YTD total on 12 month spreads. The advantage of using the Cumulative feature is that the monthly budget figures are then added to the actual YTD cumulative value. E.g. A July budget amount would be added to the June YTD actual to create a cumulative total based on YTD actual and future budget amounts.
OK, Close, Cancel:
OK – Accepts this line and sets screen for next line entry Close – Accepts this line and returns screen to summary screen Cancel – Does not accept this line and returns screen to summary screen
Edit Buttons

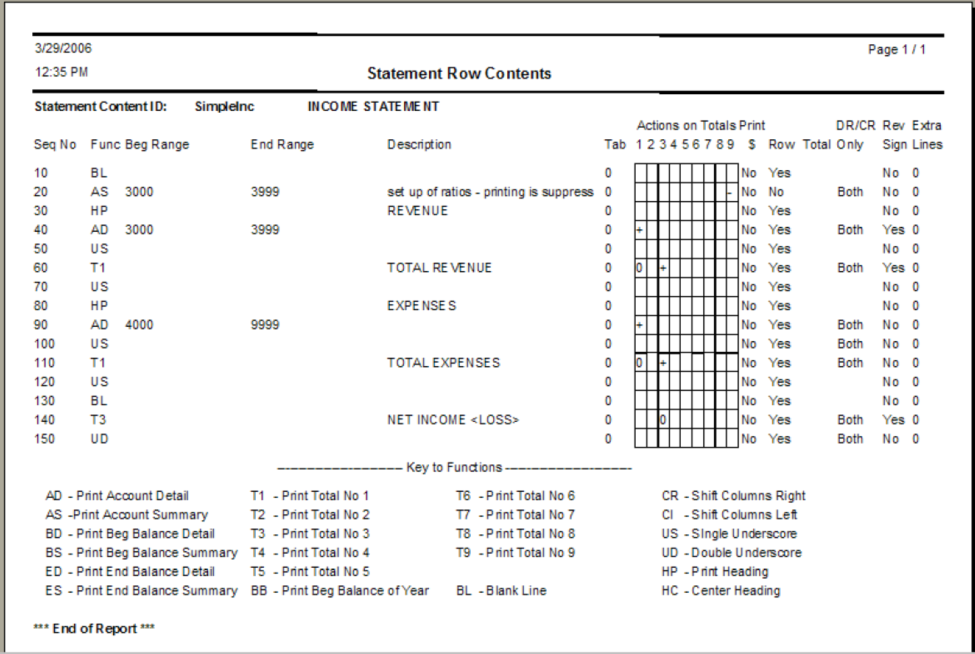
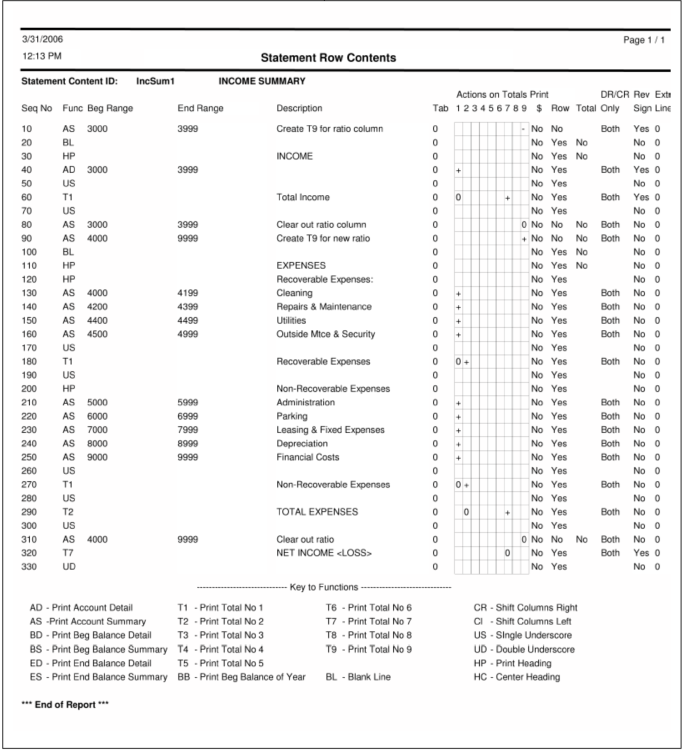
Example of Simple Income Statement Row Definitions:
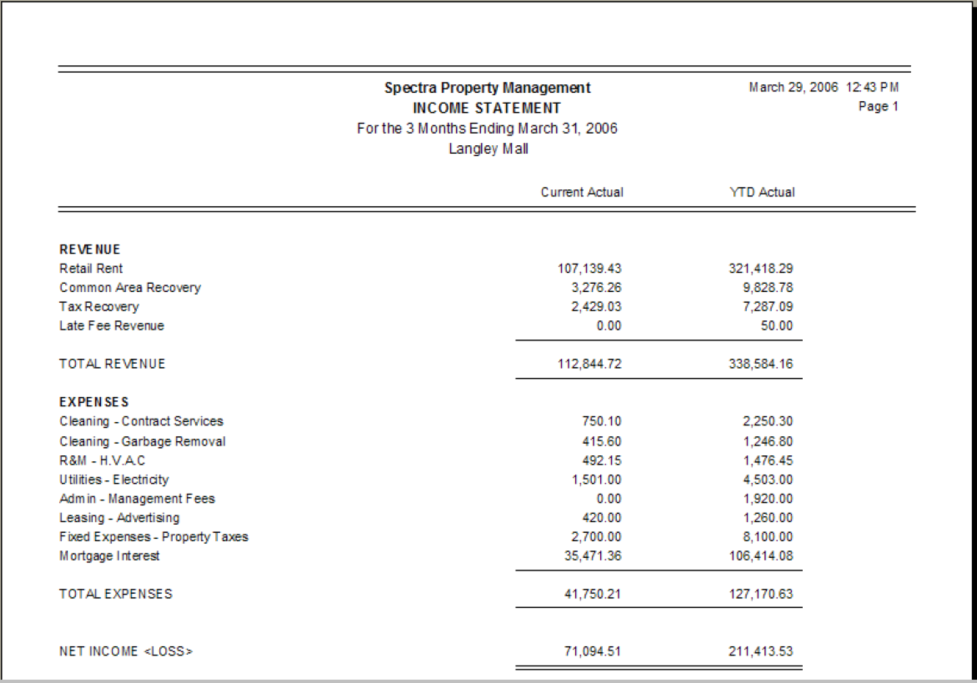
Example of Simple Income Statement Report:
User Defined Ratios
Some of the financial statement Report Names include a Ratio column to compare the figures in other columns against your revenue or expenses. Because of the flexibility of SPECTRA, you can decide which account or accounts to compare against.
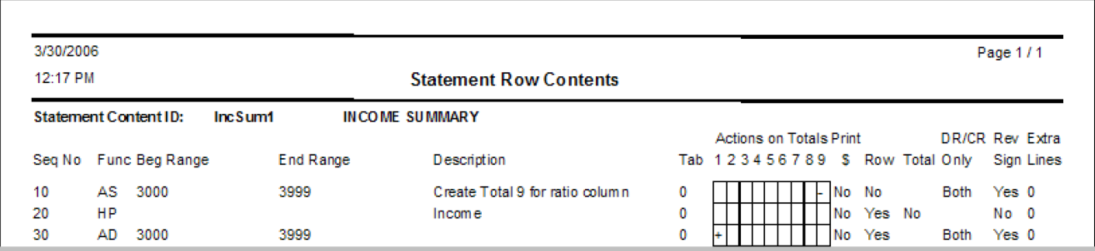
The program uses any amounts in Total 9 (T9) to calculate the user-defined ratios. If you want all amounts expressed as a percentage of total revenue, the first line of your row definition should be an AS or an AD line with your range of revenue G/L account numbers. Suppress the printing of this line and place a minus (-) in T9. (A minus sign is entered in T9 because you most likely have the sign reversed for your revenue.)
The line in your financial statement row definition will look like Line 10 below: If
If you subsequently want the percentage based on another range of GL accounts, e.g. expenses, you must zero out T9 and add another AD line to T9 with the new range of accounts:

(Note that a + was placed in T9 this time as expense accounts have a debit balance.)
Example of Row Definition with Ratios
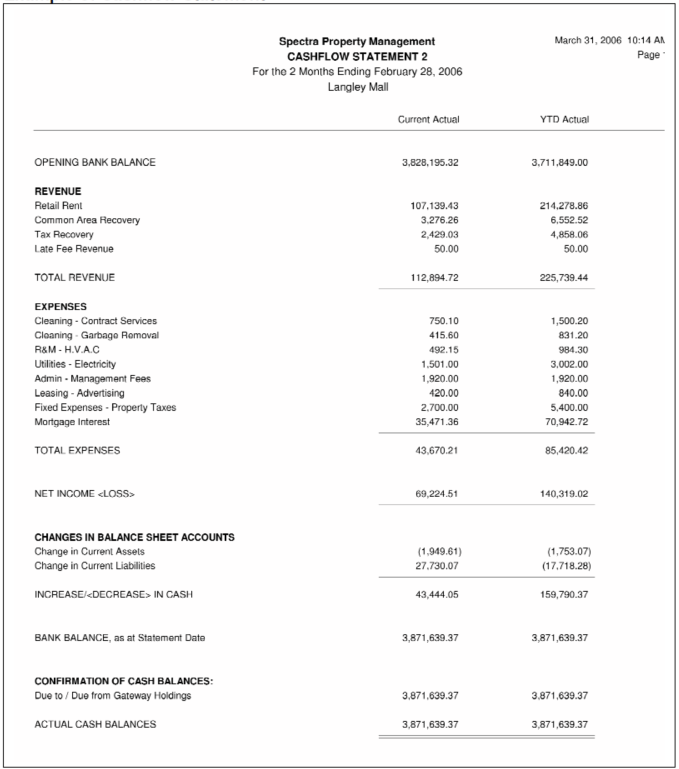
Cash Flow Statements
Cash flow statements are similar to income statements and balance sheets, but in the Changes in Balance Sheet section you will need to isolate the net change for the month. To do this, you will need to use an AD or an AS line with the Omit Opening Balances for Year to Date option selected:
If you want to detail which accounts changed, use an AD line. If you prefer to summarize these accounts as one total, use an AS line and enter the description to print on the report.

Example of Cashflow Statement Row Definition
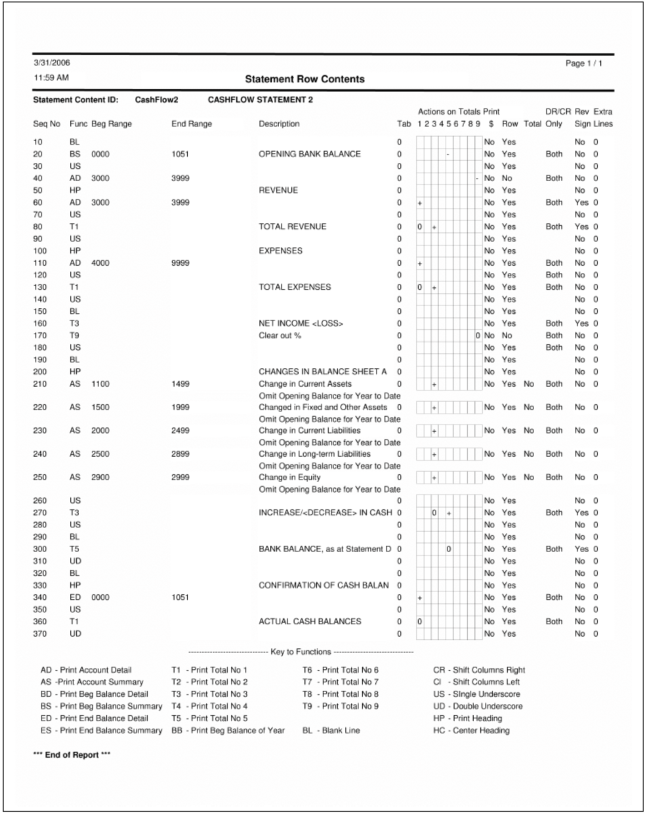
Example of Cashflow Statement Row Definition