Journal Entry Import
This module requires additional licensing. Please contact your sales account manager for details.
Any spreadsheet will be importable into SPECTRA using the following cells:
Building ID
G/L Account number
G/L Sub account number (if used)
Date (if not present, the system will prompt for a posting date)
Reference number (optional)
Description
Amount (single column of accounts or separate debit and credit columns)
Rows with nothing in the account number cell will not be imported. Therefore, these rows can be used for totaling the amount columns prior to the import into SPECTRA.
Multiple import formats can be defined so that journal entries from a variety of spreadsheets or text files can be imported as long as they meet certain conditions.
Import From Excel Worksheet

SETUP / EDIT FILE IMPORT DEFINITION
(Building – Start a Task – Journal Entries Menu)
SPECTRA requires a definition of each type of journal entry file that will be imported.

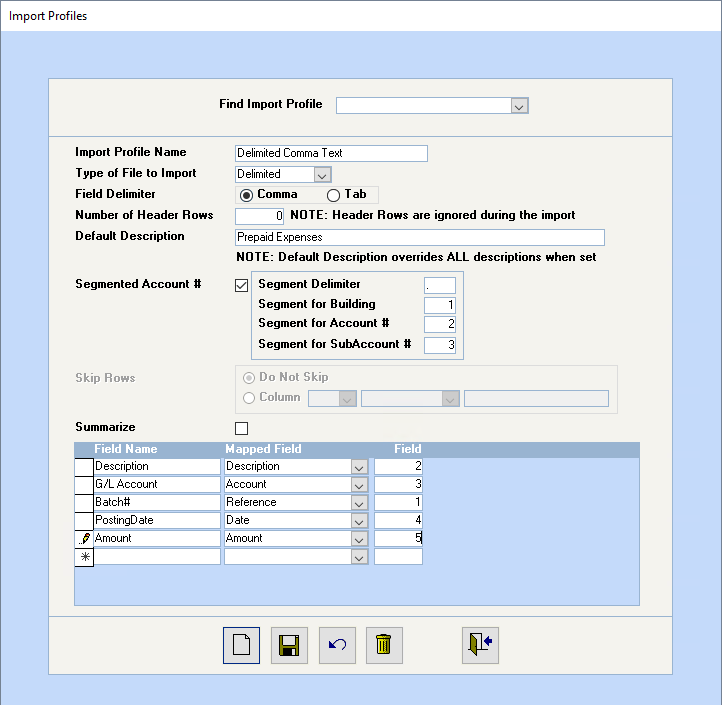
Import Profile Name
Click on Find Import File to call up an existing profile name or click on the Add New Record button to add a new record and enter whatever name matches the purpose of the journal entry, e.g. Group Insurance Distribution, Payroll Distribution, etc. Important: If you key over an existing profile name, the original record will be erased.
Type of File to Import
Select the Excel option.
Number of Header Rows
If the file to be imported has column heading lines that should not be imported, enter the number of rows at the top of the worksheet that should be ignored by the import.
Default Description
Enter whatever you want to show in the General Ledger for this journal entry’s description.
If nothing is entered, the system will use the description from the Mapped/Import field, if Description is selected in the Mapped field.
The Description in the Excel file must be limited to 50 characters. If the description in the field is longer, the Import will return an error for too many characters.
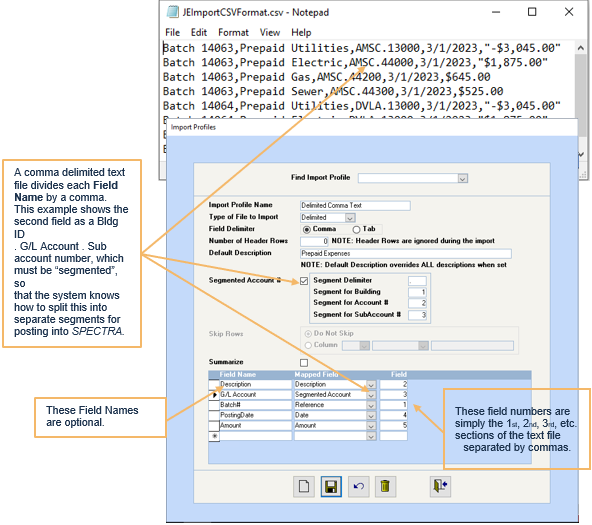
Segmented Account #
If the Bldg ID and the G/L account number are in separate columns, do not select this option. If the source document has building, account, and sub account in one field, select this option and indicate the segment for each of these.
For example, if the account is M102.1090.M100, then the Segment Delimiter is a period (.). Segment 1 is the Building ID, Segment 2 is the G/L Account #, Segment 3 is the Sub Account number. The segmented accounts area refers to the data being imported, not the way SPECTRA displays it.
In the Excel journal entry in the example below, the G/L account numbers are entered as Bldg ID . Account number. Sub Accounts are not used, which is why the field shows a zero.

Skip Rows
This section gives you the flexibility to skip records if certain conditions exist.
(Default) – No rows, including ones with zero amounts, are skipped. Zero amounts will display on the File Import report, but will not be imported into SPECTRA’s General Ledger.
The Skip Column works in conjunction with the Condition field, so that you can skip rows that have a condition in the specified column. The condition options are “Is Null”, “Is Not Null”, or “Contains”.
For example, your worksheet may consist of several lines that don’t relate to the journal entry that is to be imported. Set up a column in Excel and use that column to mark the rows not to be imported with an “X”. This column does not have to be a column that is being imported.
Set up a condition that says Skip Column J (for example) that Contains “X”, which is not case-sensitive.
Null means that the field is blank or empty. If the field contains a “zero”, it is not blank.
Only one column can be mapped in such a way, so, if you wish to use this feature to skip amount fields with no amounts in them, the debit and credit entries would have to exist in the same “Amount” column, as shown below, instead of being in separate columns.

Summarize
Select this option if you want the journal entry summarized by G/L account number. An example of this would be a payroll journal entry.
Field Name
This field is for on-screen viewing only and is not used in the journal entry. You may enter a description up to 50 characters.
Mapped Field
The following items are available as Mapped Fields: Segmented Account, Account, SubAccount, Building ID, Description, Amount, Debit Amount, Credit Amount, Date, and Reference. The order does not affect the import process.

This simple example uses all the columns in the Excel worksheet. Do not map any columns that are not required for the import. When the mapping is complete, Save and Exit.
Excel Notes:
- The Bldg ID (not the Building Name) must exist on each line of the Excel journal entry.
- Journal entries must be balanced by building. If not balanced, the import program will warn you that one or more buildings are not in balance and not allow you to complete the posting. You would be asked to review the report, correct the errors in the import file, and then re-import the file.
- Lines without a Bldg ID or a G/L number will be excluded from the import. Therefore, these lines can be used for sub totals or general notes.
- Amounts can be expressed as either a formula or a number in any number format (e.g. Accounting, Number, etc.), as it is the value that is imported.
- Format the columns used for your G/L Account and Sub Accounts as Text columns so that Excel displays the G/L account numbers correctly. E.g. If Building 100 and G/L account 1000 are entered as segmented accounts, Excel will display 100.1000 as 100.1. If the column is formatted as a Text column, it will display 100.1000 correctly.
- Debit and Credit Amounts can either be entered in separate columns or the same column. If the same column is used, enter Credit amounts as negative amounts.
- Credit Column – If amounts are separated in different columns for debits and credits, any amount in the Credit column will post as a Credit, whether it is expressed as a positive or as a negative amount.
IMPORT FILE TO G/L
(Building – Start a Task – Journal Entries Menu)
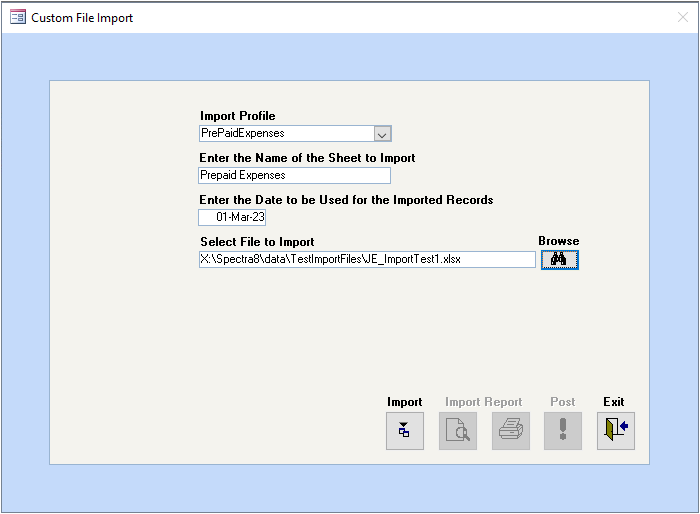
Import Profile
Select the Profile that you created in the Setup/Edit File Import Definition program.
Enter the Name of the Sheet to Import
Excel worksheets or workbooks can have any number of worksheets included. The Import program must know which of these worksheets to include, as only one worksheet is imported at a time. The worksheet name shows at the bottom of the Excel screen.

Enter the Date to be Used for the Imported Records
Enter the posting date for this G/L journal entry if no date has been set up as a Mapped/Imported Field.
Select File to Import
Click on the Browse button to find your Excel worksheet for this import.
Import
Click on the Import button to start the import process. This step will check the Excel worksheet for valid Bldg IDs and ensure that G/L accounting periods exist for the posting date. You will be warned if a G/L account number does not exist for that building or if the accounting period is closed for the posting date.
Import Report
Click on the Preview or Print button to view the journal entry to be imported. Journal entries are balanced by building and the Journal Entry Import process will only proceed if all buildings are in balance and the File Import Report shows no errors or warnings. If the accounting period selected for any building is closed, the system will post to the next available accounting period. This is true whether or not the user is authorized to make Closed Period Journal Entries.
Post
Click on the Post button. This button is grayed out until the batch passes all error checking.
AUTO-REVERSING JOURNAL ENTRIES
Create a “Regular” Journal Entry Profile and an “Auto-Reverse” Journal Entry Profile. The “auto-reverse” profile is simply the same profile, but pulls the debit and credit accounts from the credit and debit account columns of the spreadsheet (in that order).
Note:If there are multiple sheets in your Excel file, simply enter the Name of the Sheet (e.g. Page 1, Page 2, etc.) that you want to import.
Tip: If you used a Date as a Mapped Field for your journal entry to post to different months, using the Reverse a Journal Entry process would reverse all these entries to a single month. The method above would be the only way to reverse these entries to different months.
IMPORT FROM TEXT FILE
Several programs have the ability to export journal entries as text files in a number of formats, which can be imported into SPECTRA after the Import Definition has been defined.
SETUP / EDIT FILE IMPORT DEFINITION
Several programs have the ability to export journal entries as text files in a number of formats, which can be imported into SPECTRA after the Import Definition has been defined.
SETUP / EDIT FILE IMPORT DEFINITION
(Building – Start a Task – Journal Entries Menu)
Import Profile Name
Click on the Add New Record button to add a new record and enter whatever name matches the purpose of the journal entry, e.g. Group Insurance Distribution, Payroll Distribution, etc. If you key over an existing profile name, the original record will be erased.
Type of File to Import
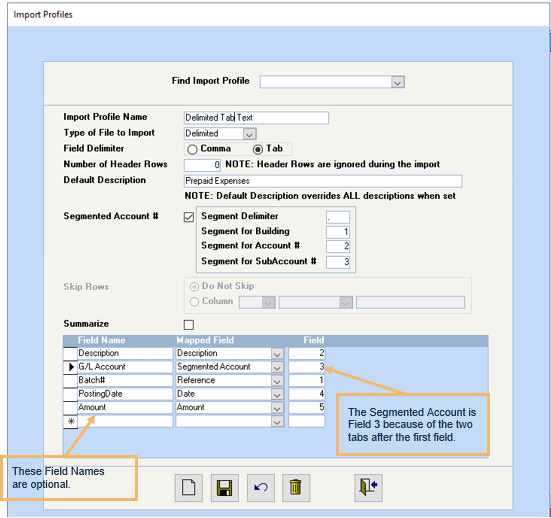
Select either Delimited or Fixed Length. Examples of Delimited and Fixed Length text files and their corresponding Import Profiles are shown below.
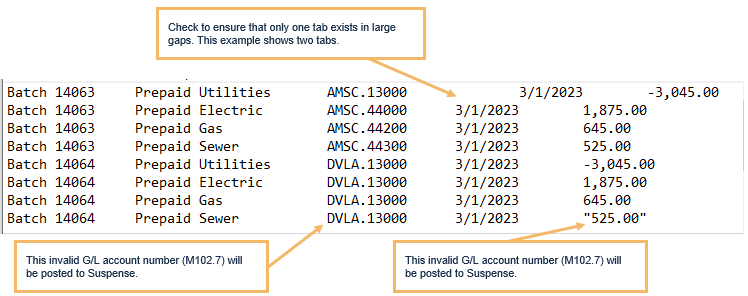
A Delimited file allows the import of any text file. If this type of file is selected, the system will prompt the Field Delimiter to be available, so that you can select the type of field delimiter separating each field, namely comma, tab, or semicolon.
A Fixed Length file is a text file where all fields are exactly the same length. The Field Delimiter field is not required.
Number of Header Rows
Check the text file to determine if your text file has header rows that are to be ignored by the import program.
Default Description
Enter whatever you want to show in the General Ledger for this journal entry’s description. Description must be selected in the Mapped field below. If nothing is entered, the system will use the description from the Mapped/Import field, if Description is selected in the Mapped field. The Description field must be limited to 50 characters.
Segmented Account #
If the source document has building, account, and sub account in any field, then you need to indicate the segment for each of these. For example, if the account is M102.1090.M100,then the Segment Delimiter is a period (.). Segment 1 if the Building ID, Segment 2 if the G/L Account #, Segment 3 is the Sub Account number. The segmented accounts area refers to the data being imported, not the way SPECTRA displays it.
If the worksheet or text file has the Building ID and Account numbers as separate fields, then you can select them as separate fields in the mapping.
Skip Rows
This section is not available for Delimited or Fixed Length text files.
Mapping Area
Example of a Comma Delimited Text File and the corresponding Import Profile Name:
Example of a Tab Delimited Text File and the corresponding Import Profile Name:
Example of a Fixed Length Text File:

Format
The system will need to know exactly how many characters or spaces are in each field. Use the Courier New – Size 12 font in Notepad to print 10 characters per inch. In this way, we determined that the fields to be the following length:
1. Description – 63 characters (Enter 50 in the Mapped Field length)
2. G/L account number – 14
3. Batch number – 10
4. Combination date, source – 23
5. Reference number – 10
6. Leave blank – 14
7. Date field – 12
8. Debit – 15
9. Credit – 15
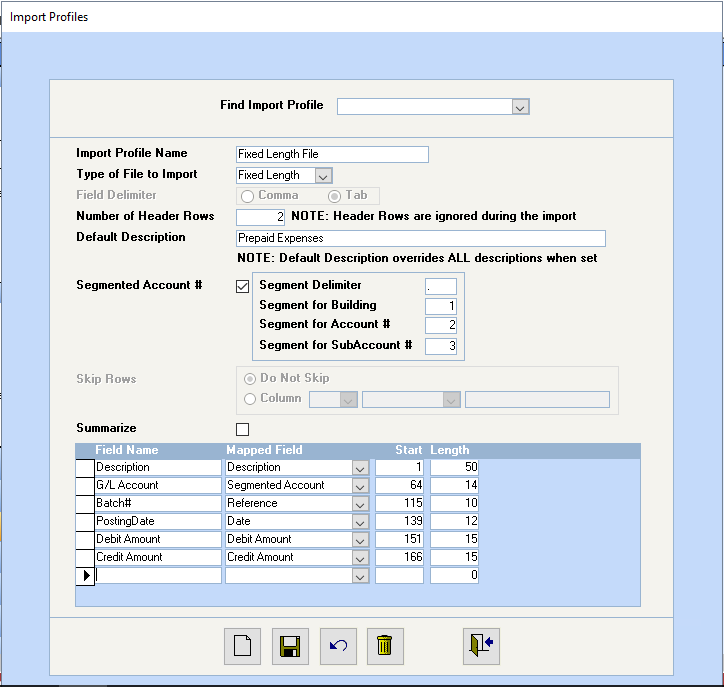
Recommendation
The Fixed Length import is very particular and the field start and length fields have to be exactly correct. An alternative is to use Excel to open the text file, which will open the Text Import Wizard. Select Fixed Length, adjust the columns, and import the text file into Excel. Then, use our Import from Excel Worksheet instructions.