OVERVIEW OF MPAC PROPERTY FORMS
The Municipal Property Assessment Corporation (MPAC) is responsible for assessing all property in Ontario for purposes of municipal taxation. Prior to 2004, property managers/owners could submit financial statements and rent rolls. However, beginning in 2004 use of MPAC’s forms became mandatory.
As MPAC will only accept their own forms, you have these choices:
• Prepare the forms manually, or
• Enter the information directly onto MPAC’s forms on their website
• Use Spectra’s MPAC module to create the information to be manually copied onto MPAC’s forms, or
• Use Spectra’s MPAC module to create the information to be uploaded to MPAC’s Internet website.
Abbreviations used:
CIR – Rental Data Request form (commercial/industrial tenants only)
TVR – Tenant Verification & Rental Data Request
PIE – Property Income & Expense Questionnaire
Reports to be submitted:
Commercial
CIR – Rental Data Request form (commercial/industrial tenants only)
PIE – Property Income & Expense Questionnaire
Residential
TVR – Tenant Verification & Rental Data Request
PIE – Property Income & Expense Questionnaire
Multi-use
CIR – Rental Data Request form (commercial/industrial tenants only)
TVR – Tenant Verification & Rental Data Request
PIE – Property Income & Expense Questionnaire
Display Settings:
It is preferable to modify your screen settings to be 1024 x 768 pixels. Certain screens will display better if you do. Go to the Windows Start button – Settings – Control Panel – Display – Settings.
Questions
If you have any questions about these forms, please contact MPAC directly by calling 1 (866) 296-6722.
Deadlines
Check with MPAC directly at 1 (866) 296-6722 for the specific deadlines for the current year.
SPECTRA MPAC SETUP INSTRUCTIONS
COMMERCIAL BUILDING
For each building, print off the following SPECTRA reports before setting up your MPAC data:
• Building – Reports – Rent Reports – Rent Roll
• Building – Reports – General Ledger – G/L Chart of Accounts
• Building – Reports – Financial Statements – Financial Statements–Fiscal – Income Statement for last Fiscal Year.
Building & Unit Information
MPAC Control
Find – Buildings – Accounting – MPAC Control tab.
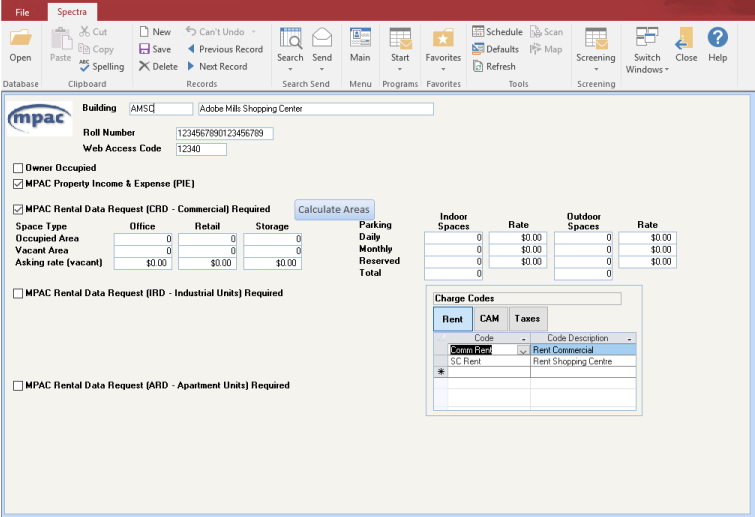
Enter the 19-digit Property Tax Roll Number for this building
Enter the code assigned to this building by MPAC. This code is mandatory, even if you will be using Spectra’s MPAC module to create the information to be manually copied onto MPAC’s forms.
Important: If you leave this field blank, you will not be able to Create, Review, Edit or Upload the MPAC Forms on the Building – Start a Task – MPAC Processing menu.
Refer to the Rent Roll or print this building’s Rent Roll (Building – Reports – Rent Reports – Rent Roll) to see a summary of all tenant charges billed on a monthly basis. Then, be sure to set up each charge code somewhere in this section or the Parking charges.
Select the Regular Charge codes in use for this building to be included in each of these headings. This step is very important as any charge codes not included will be excluded from the MPAC forms.
Escalation: The Terms & Definitions form from MPAC indicates that this is “costs/expenses over base rent subject to remittal to landlord. This applies to semi gross or gross rent (escalation payments not to be confused with ‘step ups’).”
Parking charges:
• If you charge parking on the Tenants’ Charges tab, select the relevant parking charge codes in the Charge Codes – Indoor or Surface Park section. The system has no way of knowing if a parking charge of $300 is for 1 stall or 5, so the CIR form will show 1 stall @ $300. You may edit this information in the Review/Edit MPAC Forms program.
• Do not use the same Parking charge for Indoor and Surface Parking. Again, the system would have no way of knowing in which column the Parking charges should go, so it will display these parking charges from the Tenants’ Charges tab in both columns, if the same Parking charge code is set up in both columns. You should either have different parking codes or edit the forms in the Review/Edit MPAC Forms program.
• If you charge parking on the Tenants’ Parking tab, select the parking charge codes in the Parking Stall Types – Indoor or Surface Park section. The above instruction to have separate parking charge codes does not relate to parking charged on the Parking tab, because this information is based on the Parking Stall Types.
• Note: The MPAC module will not pick up parking charges for Parking Only or A/R Only Tenants.
If you charge parking through the Parking tab, select the stall types for Indoor or Surface parking. Do not use the same stall types in both Indoor and Surface Park.
Fill in the above options based on the information received from MPAC. If a building is multi-use, MPAC will tell you which forms are required.
This applies only to commercial buildings that are 100% occupied by the owner.
When all fields are entered, click on the Save button on the toolbar and then click on the MPAC XRef tab to proceed to the next step.
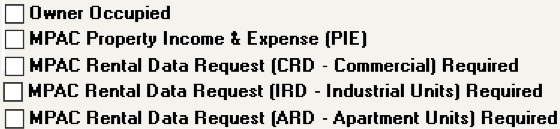
MPAC X-Ref
Refer to the Chart of Accounts or go to the Building – Reports – General Ledger – G/L Chart of Accounts, and print out the chart of accounts for this building. The purpose of the X-Ref screen is to classify all revenue and expenses to match MPAC’s requirements for the PIE Questionnaire.
Find – Buildings – Accounting - MPAC X-Ref tab.
For your first building, click on the “Copy Default” button. This will create a predefined list of Income, Income Loss, Expenses, and Capital Cost items for which you must now link to your chart of accounts. For your second building, if it uses the same chart of accounts, select the Building name from the dropdown box, and then click on the Copy from Building button. Otherwise, copy the Default and link this to your second building’s chart of accounts. Please note that the account “Type” cannot be changed and remains as Credit.
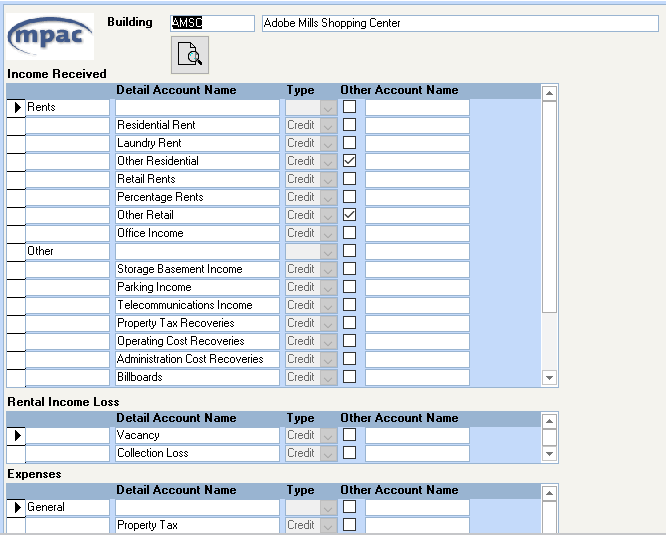
To link your chart of accounts with these Account Names, click in the “Other Account Name” field on each line.
Clicking in the “Other Account Name” field will bring up the “G/L Accounts to Include” in that Account Name. This can be one account number (enter in both the From and To fields) or a range of accounts or multiple lines of account numbers or ranges. You may key the account numbers in or select from the dropdown box.
Other Account Name
If you specify account numbers for “Other Residential” or “Other Retail” or any account descriptions that are flagged as “Other Account Names”, you must enter your own account description in the Other Account Name.
Warning: If these account numbers are used and no description is entered in the Other Account Name, the upload to MPAC will be rejected.
The Other Account Name is only required for those lines which are checked by MPAC.
Capital Costs Summary
If you replaced the roof in 1980 for a cost of $50,000, enter $50,000 in the Amount column and 1980 in the Date (yyyy) field. If you made a Capital Cost addition in the current year of $5,000, enter $5,000 in the Amount column and the year (YYYY) in the Date field. MPAC will retain the original information, and each year you enter additions only. Using this example, the current year’s form would show only the $5,000 and the year in YYYY format on the Roof line.
If you had no capital costs in the current year for any category, enter the last major addition and the year. Enter the year in YYYY format and do not leave this field blank if you have entered an amount.
When you have specified all your income and expense GL account numbers, click on the Preview Reportbutton at the top of the screen to preview the account numbers chosen for each account description. Print this report out from the Preview screen to compare with your GL Chart of Accounts. This is important if you have copied from another building, as the chart of accounts may not be exactly the same.
Unit Information – MPAC Control
MPAC Unit information can be entered in the Find Database or in the Building – Start a Task – MPAC Processing – MPAC Information – Rapid Setup. Both entry methods are explained below.
To access this screen, Find – Buildings – Units – drill down on each individual unit - MPAC Control tab.
The fields that are available for modification will depend upon the options selected in the Building – Accounting – MPAC Control screen.
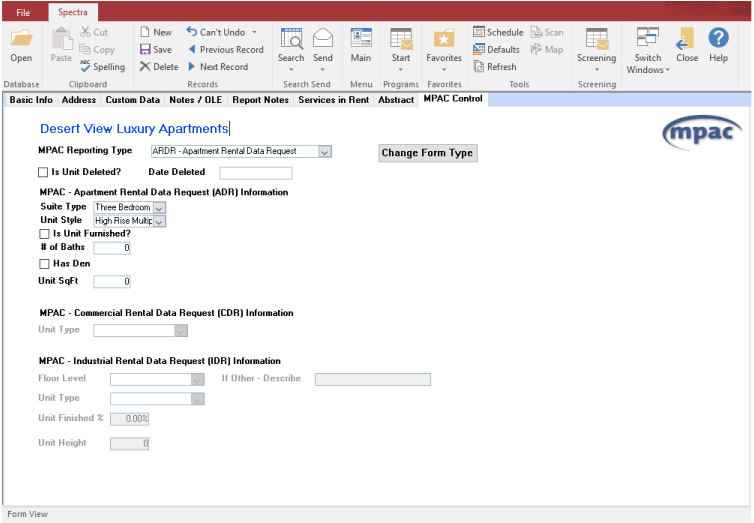
Is Unit Deleted?
Enter the date within the last 12 months that the unit was deleted (i.e. combined with another unit). A deleted unit will appear on MPAC’s report for 12 months after the deleted date.
MPAC Rental Data Request (CIR – Commercial & Industrial Unit(s) Information)
Select the floor location from MPAC’s floor definitions
Select the Unit type from MPAC’s definitions
Answer each of these questions for each individual unit.
Note: The Terms & Definitions page from MPAC clarifies that the “Taxes Included?” refers to Property Taxes.
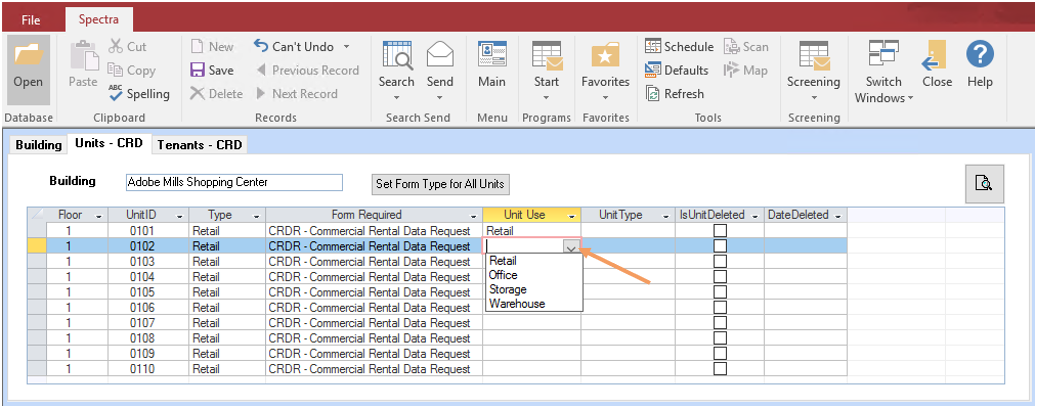
MPAC Information – Rapid Setup - Units
The same information that is entered in the Find Database on the Building tabs can be entered from the Building – Start a Task – MPAC Processing – MPAC Information – Rapid Setup.
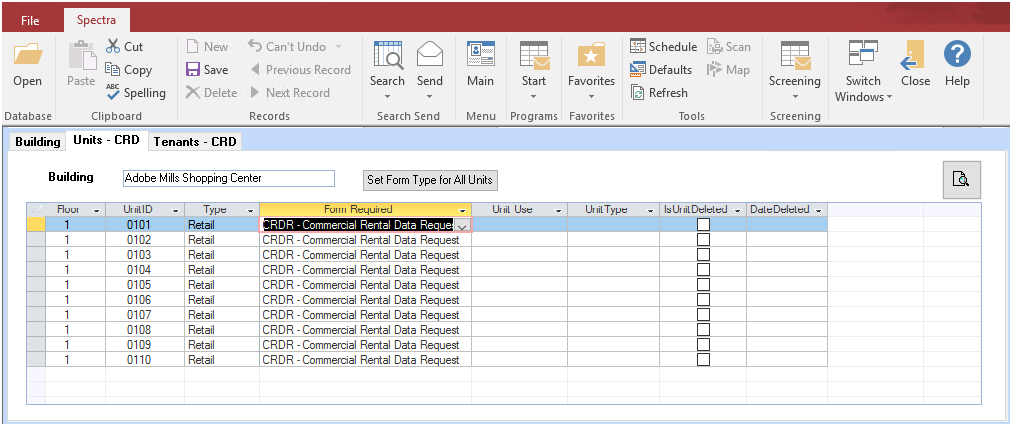
From this menu, select the building and then the relevant tabs will appear depending on whether the building is commercial or residential. Click on Units – CIR for a commercial building.
To enter data in any of the fields, click anywhere or tab into the field or use your keyboard arrow keys to move about the worksheet, and click on the drop down box for a list of the available options to appear. Conversely, if you know the answer, you can just start to key it in and the system will finish the selection. E.g. Enter “O” for Office, and the system will complete the word.
Enter the date within the last 12 months that the unit was deleted. A deleted unit will appear on MPAC’s report for 12 months after the deleted date.
Select the floor location from MPAC’s floor definitions
Select the Unit type from MPAC’s definitions
Answer each of these questions for each individual unit.
You may use the Rapid Setup form to set up new information or update existing information. Anything entered on this form will update the information stored in the Find Database.
Tenant Information
MPAC Tenant information can be entered in the Find – Tenants Database or in the Building – Start a Task – MPAC Processing – MPAC Information – Rapid Setup. Both methods are explained below.
To access the Tenant MPAC screen, click on the Tenant’s Leases button – drill down on the Lease to the Edit Master Lease screen
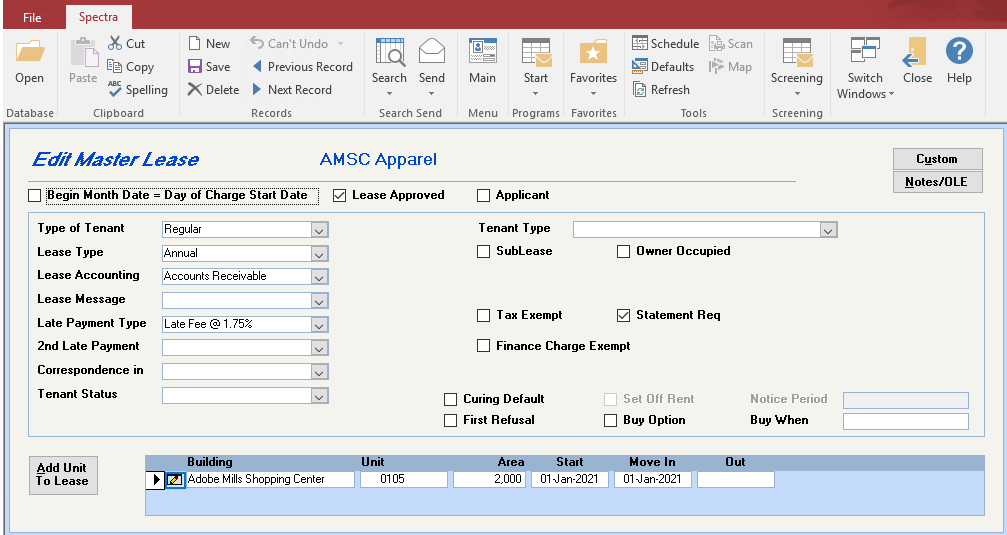
Drill down on the unit number to access the Edit Lease Details screen:
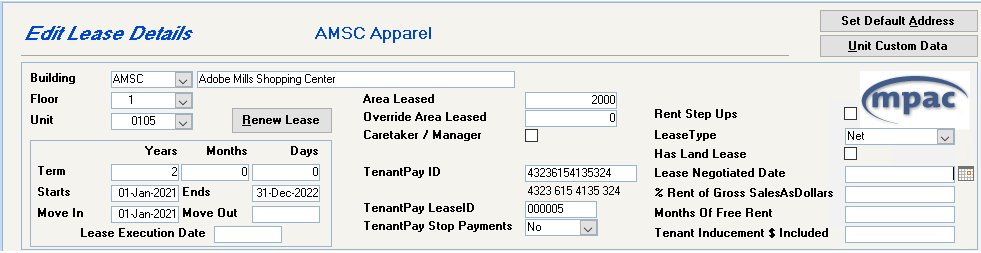
The MPAC questions are on the right side of the screen.
Note: If this area is grayed out, check that the Unit – MPAC Control information on the Building – Unit screen has been completed for this unit. See Page 8.
Does the Base Rent increase in a set fashion over the lease term? Yes/No
All expenses included in Rent
Some expenses included in Rent
Base Rent + some utilities
Number of renewal option clauses after initial term for this unit only.
Term of options, e.g. 3 – 5 year options
Identified in lease as reduced or free rent for specified time. These months are any months in the current lease – either in the past or in the future.
Monies paid by landlord to tenant to offset tenant improvement costs.
Repeat for each tenant.
MPAC Information – Rapid Setup - Tenants
If this is a Commercial building, the same information that is entered in the Find Database on the Tenants’ Leases tab can be entered from the Building – Start a Task – MPAC Processing – MPAC Information – Rapid Setup screen. Select a commercial Building on the Building tab, and the Tenants-CIR tab will appear.
Note: A/R Only and Parking Only Tenants will appear on this Rapid Entry Tenant Screen, but they will not appear on the MPAC Review/Edit/Validate MPAC Forms. Nor will they be uploaded to MPAC.
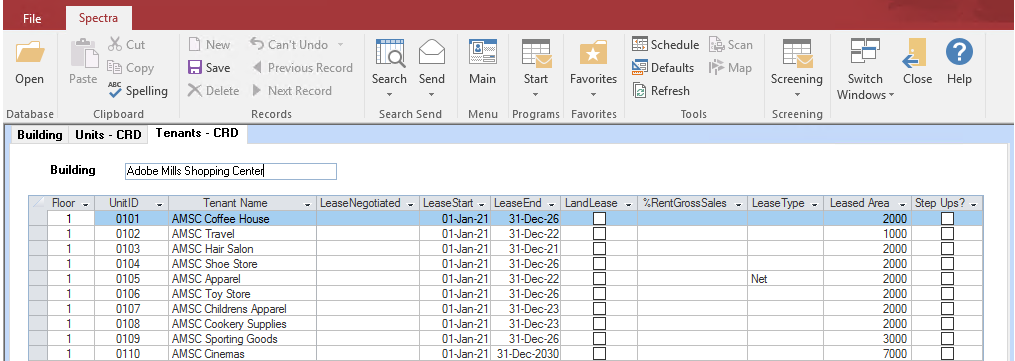
To enter data in any of the fields, click anywhere or tab into the field or use your keyboard arrow keys to move about the worksheet, and click on the drop down box for a list of the available options to appear. Conversely, if you know the answer, you can just start to key it in and the system will finish the selection. E.g. Enter “G” for Gross, and the system will complete the word.
Does the Base Rent increase in a set fashion over the lease term? Yes/No
All expenses included in Rent
Some expenses included in Rent
Base Rent + some utilities
Number of renewal option clauses after initial term for this unit only.
Term of options, e.g. 3 – 5 year options
Identified in lease as reduced or free rent for specified time. These months are any months in the current lease – either in the past or in the future.
Monies paid by landlord to tenant to offset tenant improvement costs.
You may use the Rapid Setup form to set up new information or update existing information. Anything entered on this form will update the MPAC information stored on Tenants’ Leases.
Residential Building
For each building, print off the following SPECTRA reports before setting up your MPAC data:
· Building – Reports – Rent Reports – Rent Roll
· Building – Reports – General Ledger – G/L Chart of Accounts
· Building – Reports – Financial Statements – Financial Statements–Fiscal – Income Statement for last Fiscal Year.
MPAC PROCESSING
(Building – Start a Task Menu)
CREATE MPAC FORMS
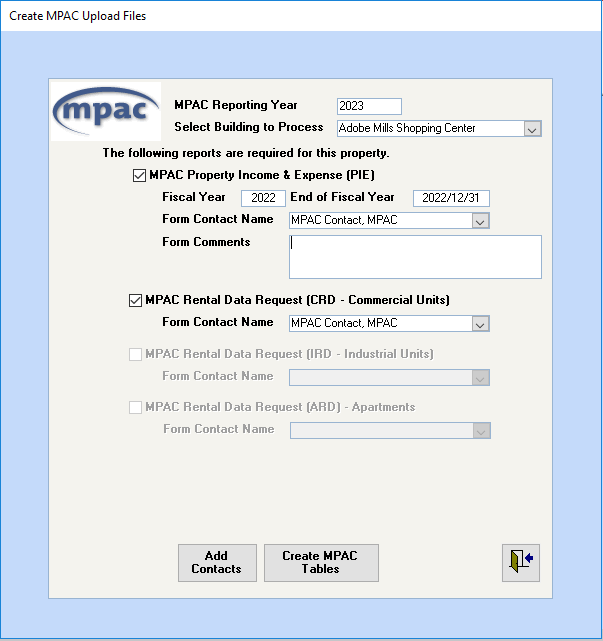
Defaults to the current year, but you can change this.
When you select the building you want to process, the system will automatically check the options based on the information on the Building’s Accounting – MPAC Control tab.
The system will default to the previous fiscal year. You may override this, if you wish.
Click on the dropdown box to select an existing contact name or click on the “Add Contacts” button to enter the contact name of the person in your company in case the assessor has questions about the information submitted.
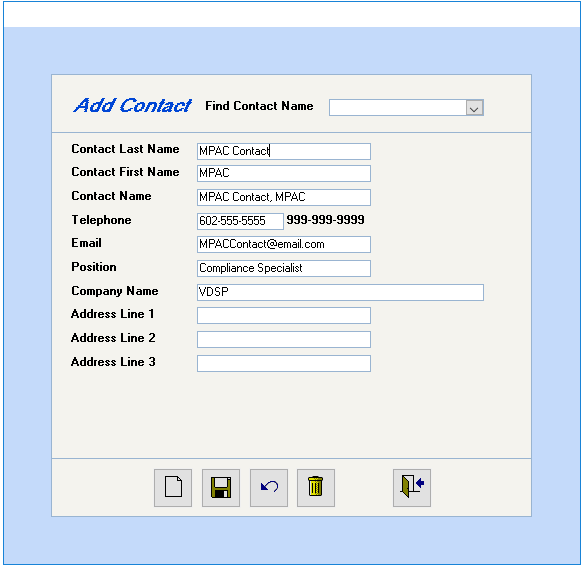
Enter the telephone number with the dashes as shown above.
The Company name is a 50-character field.
Important: A Contact Email address is mandatory for the Upload step. If your chosen contact does not have an email address, enter an email address of an associate.
Edit: If you need to edit the information on an existing contact, click on the Add Contacts button again. The Add Contacts button will return you to this screen, and then you should use the Find Contact Name to locate the contact to be edited.
You must reselect the contact each time you Create MPAC Tables.
Click on this button to create the tables, which will allow you to review and edit the data to be submitted. This does not upload any information to MPAC.
If, after your review, you discover that a charge code was left off the MPAC Control or the same Parking code was set up in both Indoor and Surface Parking or something else that needs to be changed, you must re-create these tables. Clicking on the Create MPAC Tables will overwrite the previous information for this building entirely.
This means that, if you manually made any changes to the system-generated information in the Review/Edit/Validate MPAC Forms screen, you will need to make those changes every time you click on the Create MPAC Forms button.
REVIEW / EDIT / VALIDATE MPAC FORMS
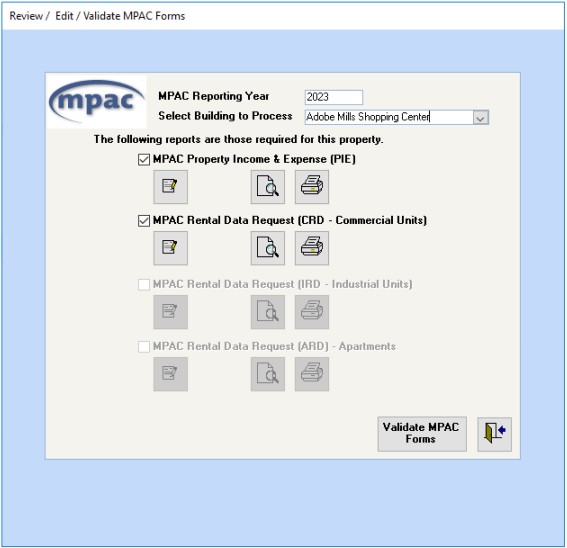
 Edit any of the system-generated information. Be warned, however, that any changes entered here will not change the information in Spectra’s database. Therefore, if you click on the “Create MPAC Tables” button again on the Create MPAC Forms screen, these changes will need to be entered again. Make the changes permanently in the Find Database or the Rapid Setup screen.
 Preview the selected report.
 Print the selected report to use for your review step. If the review does not reveal any errors, keep this printout for your records.
Review
· At this point you should carefully compare the MPAC Property Income & Expense (PIE) statement to your Income Statement to ensure that all the correct General Ledger account numbers were entered in the MPAC X-Ref screen on the Building – Accounting.
· CIR Form – Compare the CIR forms to your Buildings’ Rent Rolls. If a charge is missing, check the Building-Accounting-MPAC Control screen to ensure that it was set up as in the Charge Code section. If any information is wrong, it is preferable to correct it in the Rapid Setup screen, so that this information is permanently stored by the system. The CIR Form will calculate the annual base rent as of January 1st.
· TVR Form – Compare the TVR to your Buildings’ Rent Rolls. If an occupied unit shows 365 days vacant, check if the tenant has the sublease flag checked on the Tenant’s Leases tab. If a unit has only a sublease, the system will report 365 days as vacant. Either set up a tenant as a master lease or remove the sublease flag from the existing tenant.
 If you have any questions about these forms, please call MPAC directly at 1 (866) 296-6722. Click on this button for the program to check all the data entry in preparation for the Upload step. The system will indicate any reasons why the Upload process would fail.
UPLOAD MPAC FORMS
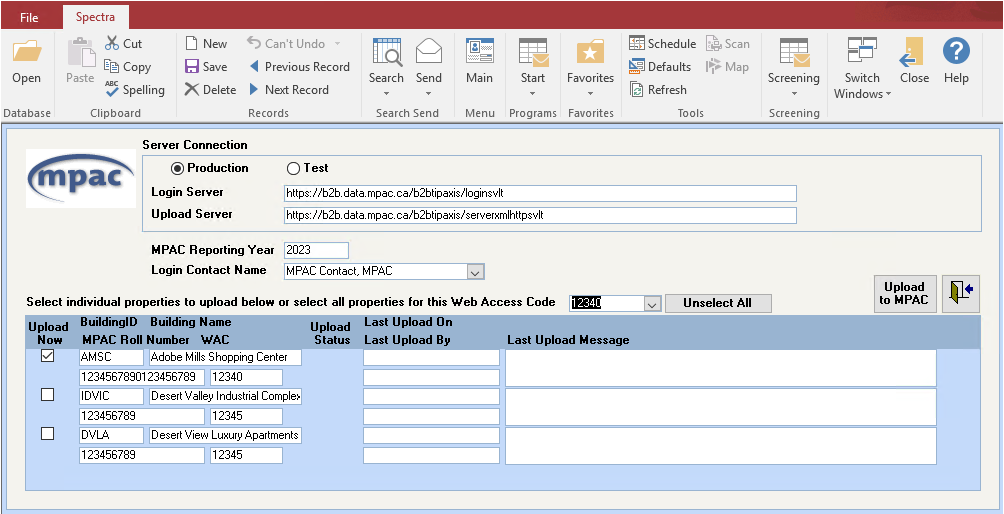
Production. Select the default of Production.
The URL’s have changed for 2007 to the following
https://b2b.data.mpac.ca/b2btipie/loginsvlt
https://b2b.data.mpac.ca/b2btipie/serverxmlhttpsvlt
They may change this for some reason in the future, so if a server location change is provided by MPAC, key in that information here. This upload screen will always default to the information as shown above, so remember to key any change each time you upload.
Defaults to the current year, but you may change this.
This is a mandatory field as the Upload to MPAC will not be processed without it. Remember that the Contact Name must have an email address associated with it. If you need to add another contact name, return to the Create MPAC Forms program.
Select individual properties or select all properties using a specific Web Access Code. Click on the drill down button beside the Web Access Code field for a list of Web Access Codes that you have used.
To change to another Web Access Code, click on the Unselect All button to clear the buildings previously selected.
When you click on this button, the system will verify if all properties have the required information before completing the Upload process.
Troubleshooting
If you encounter an error message, check with Spectra Support to ensure you are using the correct release level.
Depending on how your firewall is configured, you may get timeout errors when uploading to MPAC.
The MPAC upload process requires verification back from the MPAC server. If you experience an error message that refers to the operation ‘timing out’, you or your technician may wish to review any firewalls you have set up, and temporarily disable your firewall for the duration of the upload process.