Supplier - Accounting
1. In the Navigation Pane go to the Find > Suppliers > Search for and drill down on a specific Supplier > Click the Accounting tab.
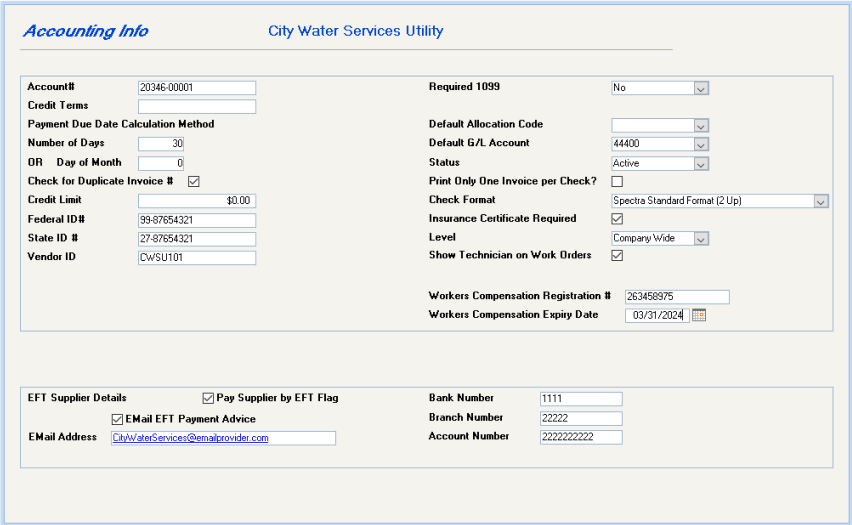
Account #:
Enter the account number or name assigned to you by the supplier (optional)
Credit Terms:
Enter the supplier’s credit terms (optional)
Payment Due Date Calculation Method:
Enter either the number of days or the day of the month that payments are due. Default is 30 days.
Check for Duplicate Invoice #?
The system automatically disallows duplicate invoice numbers, which is good for most of your suppliers. However, utility bills and mortgage payments typically have account numbers, which are normally entered in place of the invoice number. To suspend duplicate invoice number checking, remove the flag from this field.
Credit Limit:
Enter the credit limit. This information is available for onscreen viewing or as a merge field for export from the Database Listing program.
Federal ID# and Prov/State ID#:
In the Federal ID number field, enter the supplier Federal tax number and the Provincial or State tax number in the Provincial/State ID field
Required 1099
If Yes was selected entered, select the 1099 type. Options are: Miscellaneous, Interest, or Dividend.
1099 Type
If Yes was selected entered, select the 1099 type. Options are: Miscellaneous, Interest, or Dividend.
Default Allocation Code:
If you normally code this supplier’s invoices to the same G/L distribution, set up a Supplier Allocation Code and enter it here. See Supplier Allocation Codes in the Help Files for more information. You also have the option to leave the Default Allocation Code account field blank. Wherever Supplier Allocation Codes are used, you have the option to override this supplier’s allocation code.
Default G/L Account:
If you would like invoices for this supplier to be coded to a particular G/L account, enter it here.
Status:
The Status field will default to active, but can be changed later to inactive or delete. If you no longer use a supplier, we do not recommend that you delete the supplier from the Deletions menu item, as this will cause you to lose all history of this supplier. Rather change the status to "Inactive" and this will cause the supplier’s name to be omitted from the drop down list of suppliers in Invoice Entry and Handwritten Checks.
One Invoice per Check:
Select this option if you want each invoice paid on a separate check. An example of this usage might be mortgage checks, so that each mortgage payment will generate a separate check.
Check Format:

Spectra Standard Format (2 Up)
Check stub displays 2 columns of up to 30 invoice numbers
Spectra Job Cost Format
This format will print the invoice amount, retention, discount, and amount paid.
Spectra Standard Format (1 Up)
Check stub displays 1 column of up to 15 invoice numbers including discounts taken.
Spectra Standard Format (1 UP – G/L Detail)
Top check stub displays invoice numbers, date, building ID, GL account, invoice description, voucher number and line amounts. Bottom check stub shows invoice number, date, building name, voucher number, and invoice amounts.
Spectra Standard Format (1 UP – Invoice Description)
This format was added in the 2011 release and will print the default invoice description. To make this change to multiple suppliers, go to System Tasks – Spectra Utilities – Check Supplier Check Stub Format.
Insurance Certificate Required:
Select this option if insurance is required. This option must be flagged if you will be filling out the Insurance screen. If this option is selected, you will be alerted if any type of insurance has expired when entering supplier invoices. Therefore, if a Workers’ Compensation insurance certificate has expired, but a General Liability insurance certificate has not, a warning message will display in Invoice Entry.
Level:
Select the level that the insurance applies to – company wide or for a specific building. You must also setup an Insurance record on the Insurance tab.
Workers Compensation Registration #:
Enter the workers compensation registration number if applicable.
Workers Compensation Expiry Date:
Enter the expiration date of the workers compensation insurance if applicable.
Once this screen has been completed, click on the save button.
EDI Supplier Details
If you have any of our Supplier EDI module, in Release 7.1 we added the ability to email the supplier with details of the remittance paid to suppliers by electronic funds transfer.
