Work Order Module
The SPECTRA Work Order Module includes full inventory control, and requires that you set up the various components in the following order:
1. Set up General Ledger Account Numbers and add Regular Charge Code for Work Orders
2. Sales Tax Considerations
3. Set up Maintenance Department Configuration
4. Add Maintenance Control Codes
5. Add Category Info
6. Add Product Info
7. Enter Existing Inventory
8. Enter New Inventory
9. Create Work Order
No Inventory?
We assume that you will be setting up inventory, but if you don’t want to use the inventory component of the Work Order Module, set up one inventory type, and as many category info codes as you require to describe how the materials are used. In setting up the Category Info codes, use the same G/L account # for the Asset and the Cost accounts, but in fact, the system shouldn’t use them at all. When you enter a work order, select the product item “Non- Inventory Items”, and you will be prompted to provide details. Your work orders will then allow you to sell materials without any effect on the G/L Inventory.
General Ledger Account Numbers
If the following accounts do not exist in your G/L Chart of Accounts, add them now and use the Copy Chart of Accounts Wizard to copy them to all buildings. The use of sub accounts is optional. If you do not use sub accounts, leave the sub account fields blank when prompted for them. (Record these new account numbers for use during setup.)
Asset Accounts:
• Inventory Accounts – Set up one G/L account number for all inventory or one for each Product Category.
• Inventory Clearing Account – for use when inventory is used for a different building than the inventory warehouse.
Liability Accounts:
• Work Order Interdepartment Account - to record offsetting entries if you are using a separate profit center for the maintenance department. (2720 in our examples) Note: Having a separate Work Order Interdepartment account keeps work order transactions separate from any other interdepartment activity.
• Work Order Clearing Account - Posting of Work Orders and inventory items is a two-step process. When you post a Work Order to a tenant, the accounting is Dr. A/R and Cr. Clearing account. The second part of the Work Order accounting is Dr. Clearing account and credit Sales, etc. Make this a separate account number.
Revenue Accounts:
• Sales – Set up as many Work Order Revenue accounts as needed
• Work Order Labor – You may set up one revenue account or one labor revenue account for each Work Order Activity code. These accounts should be added to the building your maintenance department is in.
Cost of Sales Accounts:
• Cost of Sales – Set up corresponding Cost of Sales accounts to coincide with the Sales account numbers.
Expense Accounts:
• Before you set up your Work Order Categories, print out and review your chart of accounts. Set up any missing expense accounts. I.e. If you set up a Work Order Category called Painting, and a work order is done by the Maintenance Dept on one of your buildings, does the R & M – Painting account exist?
Accounting Code to Bill Tenants
Go System Tasks – Control Codes – Accounting Codes and add one Regular Charge code for Work Orders. The Maintenance Department Configuration File defaults to the code “WorkOrder”.
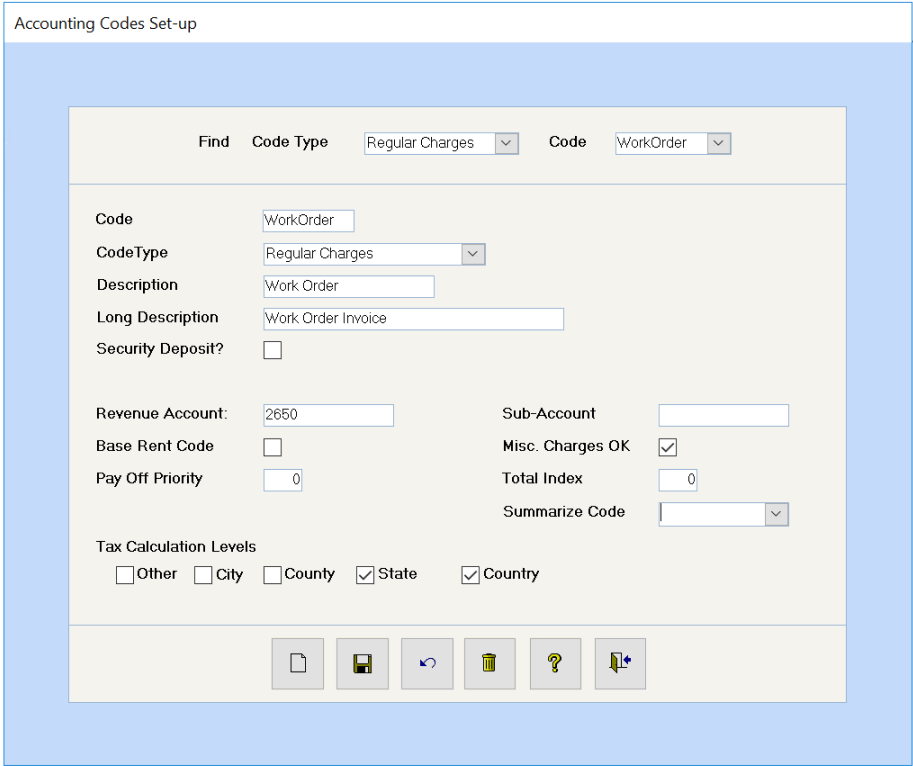
Important:
This code must be exactly the same code that will appear on the Maintenance Department Configuration screen. It must be coded to the Work Order Clearing Account – account 2650 in our examples. Be sure to mark what levels of sales taxes
Sales Tax Considerations
If you don’t calculate and charge sales taxes, move onto the next step. If you charge sales taxes, please review the following very carefully.
Many companies are required to charge some level of taxation on work orders, even to tenants in residential buildings. The logic by the tax authorities is that, “What is the difference if it is ABC Painting Company providing the service or your maintenance department?” If it’s taxable by the one, then it is taxable by the other. If you are uncertain of the tax laws, please check with your local tax authority for clarification.
Important Information:
The system will use the tax levels set up on the building receiving the work. In Canada, therefore, a Quebec company may do a work order for a New Brunswick company, and the system will charge HST instead of GST. Similarly, in Minnesota, a Minneapolis company providing a service to an Eden Prairie building will charge the Eden Prairie tax rates, not the Minneapolis tax rates.
Taxes Charged to Tenants:
If you charge sales taxes on work orders on buildings which do not currently have any tax levels set up, you must:
Go to Building – Reports – Master Listings – Building Summary Listing. Print this report for all buildings to see what tax levels need to be added. E.g. Residential buildings will probably need to have a tax level and percentage added.
Go to Find - Buildings – double click to display all buildings – call up each building that needs to be changed. Go to the Accounting screen and click on the tax levels that will apply to your work orders. Repeat for all buildings to be changed.
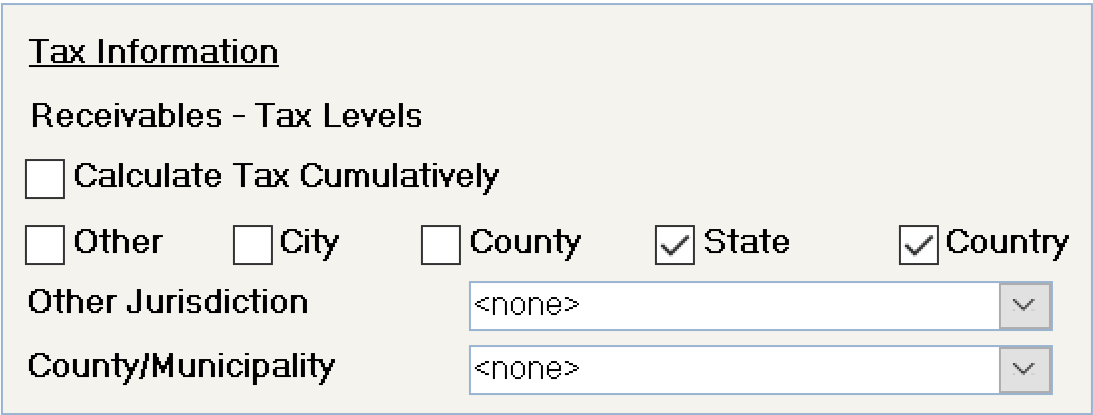
Go to Building – Reports – Control Code Listings – Accounting Codes, and print out a listing of the RC Regular Charges codes. Review this list for any codes that may affect your residential buildings. e.g. If Residential Rent has any tax flags set, then you will want to remove these flags, so that the Begin Month doesn’t calculate tax on residential rent. (These flags didn’t matter when the building wasn’t taxable, but now that it is, the flags on the charge codes are very important.)
Go to System Tasks – Control Codes – Accounting Codes and edit any codes that need to have tax flags removed. Pay particular attention to codes that may be used in both residential and commercial buildings, e.g. Parking. You should have two codes: Parking – Non Taxable and Parking – Taxable so that you can control the tax calculations.
Go to Building – Reports – Rent Reports – Rent Roll and run the rent roll with the “Calculate Sales Tax” flag on. View the report on the screen to see how the Begin Month will calculate sales taxes.
Go to Find – Tenants: Make any changes to the tenant charges or parking charges that you discovered by running the Rent Roll. If you added a Parking – Non Taxable code, you will most likely need to change your residential tenants so that they use this new code.
Tax Expense (Payables):
Canada – Work Orders to Buildings
If the Maintenance Department is a profit center and if Calculate Input Tax Credits is ticked on the Building – Accounting screen, the system will expense the GST charged to the Input Tax Credit account number stored on the Building file.
If the Maintenance Department is a profit center and if Expense GST/HST separately is ticked on the Building – Accounting screen, the system will expense the GST to whatever account number you have selected for this purpose.
If the Maintenance Department is a profit center and if neither box is ticked, the system will expense the GST to the G/L Expense account stored on the first Work Order Activity code used on the work order. If no Work Order Activity code is used, it will expense the GST to the first Category Info codes.
If the Maintenance Department is a profit center, whether GST is chargeable for work done in other buildings is dependent on whether the maintenance department is a separate legal entity. We cannot determine this, so you control whether the GST will be charged. If it is not a separate legal entity, simply do not calculate taxes, so that no GST will be calculated. If you do calculate sales taxes, the system will handle it as indicated above.
If the Maintenance Department is not a profit center, the system will not calculate sales taxes for work done to buildings. It will calculate sales taxes for work orders to tenants.
Other Countries – Work Orders to Buildings
If the Maintenance Department is a profit center, the system will expense the sales taxes to the G/L Expense account stored on the first Work Order Activity code used on the work order. If no Work Order Activity code is used, it will expense the sales tax to the first Category Info codes.
Maintenance Department Configuration
(System Tasks – Spectra Utilities – Maintenance Department Configuration)
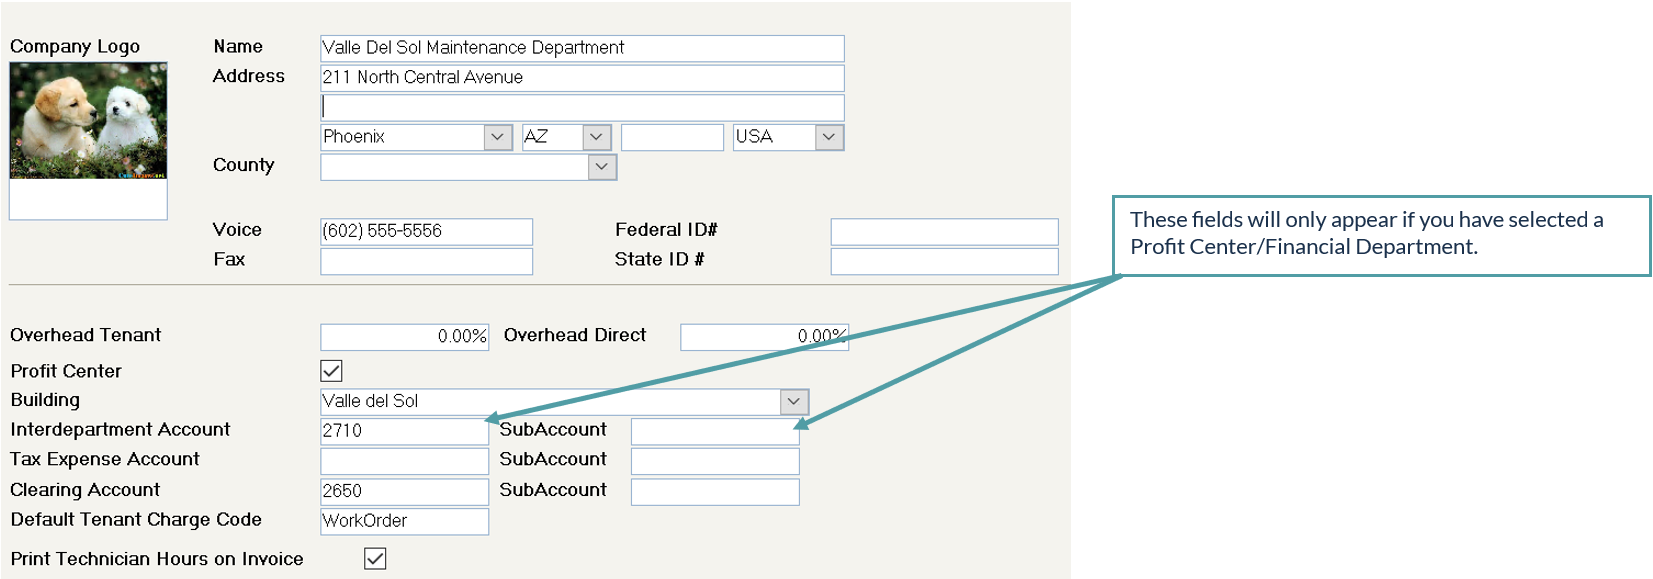
Company Logo:
This field will be operational in a future release.
Name, Address, Voice, Fax:
Only one maintenance department can be set up on the system. The name, address, telephone and fax numbers, etc. entered here will print on all reports from the Work Order module. If you would like a different name and address, you can setup a Work Order address on the Building Address screen. The Building Work Order Address will override the Maintenance Department Configuration address.
Overhead Tenant
The percentage entered will be added to the selling price of materials and the (either technician’s rates or subcontractor’s costs) to be charged to the tenant. Enter 25% as 25% or as .25.
Overhead Direct:
The percentage entered will be added to the selling price of materials and labour (either technician’s rates or subcontractor’s costs) to be charged to the buildings for internal costs. i.e. If the maintenance department does work for other buildings, then these buildings will pay the technician’s rate plus the percentage entered in this field. Enter 10% as 10% or as .10
Profit Center:
Yes: If this is a Profit Center, the revenue will be recorded in whatever building the maintenance department is in, which you must enter next. The correct buildings will be expensed and the system will handle the interdepartment entries.
No: If this is not a Profit Center, both the revenue and the expense will be recorded in whatever building the work is done.
Building:
If you indicated that this is a Profit Center, then you will be prompted for the building name in which to include this Work Order Revenue and the Interdepartment and Clearing Accounts.
Interdepartment Account/SubAccount:
If you indicated that this is a Profit Center, enter the G/L account/subaccount number through which interbuilding entries should flow. i.e. If one building’s expense is another building’s revenue, the system will need to know the Interdepartment Account/SubAccount to which to post the offsetting entries to keep each building in balance. This may be the same number as your existing Interdepartment Account, or you may wish to set up an account to be used solely for Work Order entries.
Do not use the Suspense account.
If you will be automating the payout of revenue from work orders charged to buildings to the maintenance department, then having a separate Work Order Interdepartment account is mandatory.
Clearing Account/SubAccount:
The posting of work orders to Tenants is an internal two-step process, which requires a clearing account. Give this account a unique account number, 2650 in our examples.
When you post a Work Order to a tenant, the accounting is Dr. A/R and Cr. Clearing account, and the second part of the posting is Dr. Clearing account and Cr. Sales, etc. If you use the accrual accounting method, the balance of this account should always be $0.00.
If you use the cash accounting method, the account will have a debit balance if the work orders have been posted but the tenant has not yet paid. After a receipt has been applied against the work order charge, the clearing account will be credited and reduced to a zero balance.
Default Tenant Charge Code:
Whether or not you have indicated that this is a Profit Center, you must enter the code, e.g. “WorkOrder”, that you have just set up. Although you key this code in, it must be exactly the same as the code you set up on Page 5.
Print Technician Hours on Invoice:
The Labor component of the work order invoice will only show the number of hours billed if this flag is set on the Maintenance Configuration File. Otherwise, only the dollar amount of the labor portion of the work order will print.
Update Maintenance History on Units
When you post work orders, you will have the option to update the maintenance history for the unit related to the work order. The Building Maintenance Reports supplement the Work Order reports by tracking all maintenance for specific units, scheduling future (recurring and nonrecurring) maintenance not requiring a work order, and by providing comparisons of costs over previous years.
Beyond their use in conjunction with Work Orders, you can use them to update your database directly without affecting your general ledger, allowing you to record maintenance done prior to implementing the Work Order module in SPECTRA.
Incorporating this functionality is optional, but, if you decide that this would be useful information for you, it will require the use of Building Maintenance Codes.
Procedure:
Add Maintenance Codes
(System Tasks – Control Codes – Building Maintenance Codes)
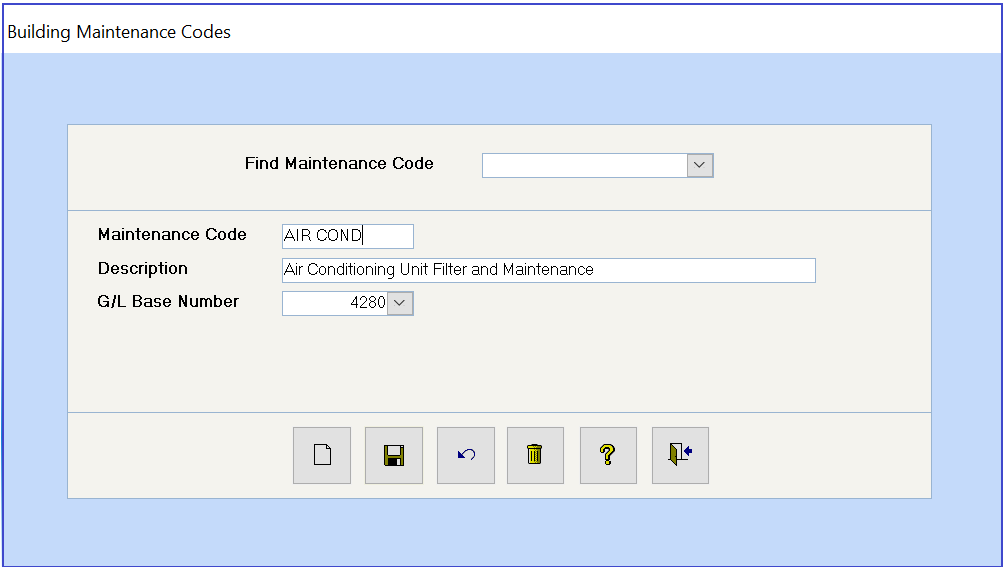
Click on Add New button
Maintenance Code:
No more than 10 characters
Description:
No more than 40 characters
G/L Base Number:
Leave this field Blank or enter the G/L Account number to which this expense will be charged.
If you leave this field blank, the code will still be available for your use in updating the unit maintenance field when entering work orders.
If you enter a General Ledger account number, whenever you code a supplier invoice to this General Ledger account number in Supplier Invoices or Handwritten Checks, the system will then prompt you to enter the Maintenance Management information for the unit.
We recommend that you enter the General Ledger account number so that you will be able to use the full Maintenance Management module.
Click on Save button
Repeat the above steps until all codes are entered, and then Exit.
For more information about the full functionality of the Maintenance Management module, please refer to the Help Files – Index – Maintenance Management.
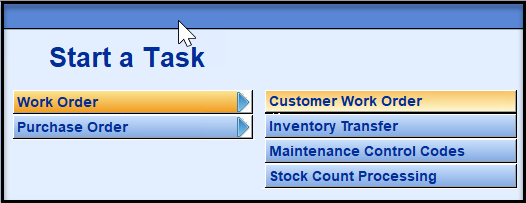
Maintenance Control Codes
(Supplier – Work Order – Maintenance Control Codes)
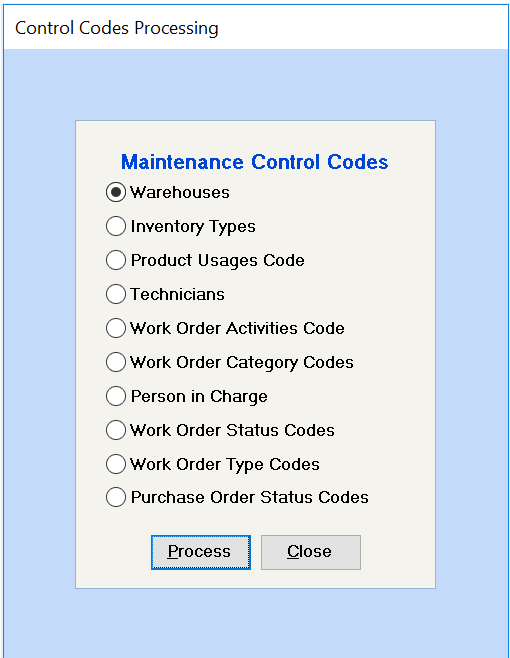
Select the Maintenance Control Code from the screen below – using your mouse or Up/Down arrow keys.
Click on Process to view your selected code type.
Cancel to return to the Main Menu.
Report:
To print a report of all codes set up for any Maintenance Control Code, go to the Supplier – Report – Work Order–Maintenance Control Code Listings.
Adding Maintenance Control Codes:
Add at least one code to all ten types of control codes. All Work Order Control Codes have the same processing buttons, i.e.
Use this Find field to find an existing code.
The same buttons are used in the Work Order module as are used elsewhere in SPECTRA. Click on the Add button to add a new code.
Wharehouses
(Supplier – Work Order – Maintenance Control Codes)
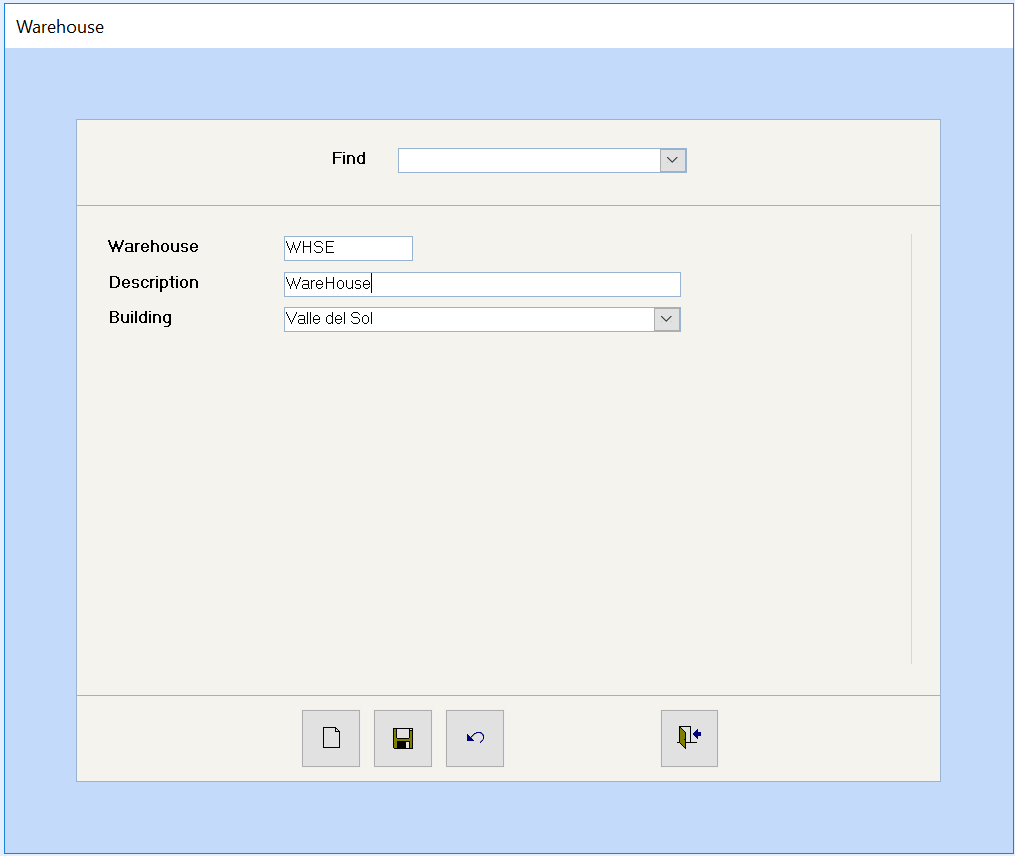
Wharehouse
Enter a code (up to 4 characters) to identify this warehouse. You may only have one central location for all inventories, in which case, you only need one code, or you may have several locations and need a code for each site.
You may even choose to set up each van or truck as an inventory center to keep track of the exact location of all materials. When a technician removes items from the main inventory to his working van, then this inventory is “transferred” to that van.
Description:
Enter a description (up to 30 characters) to identify this warehouse location.
Building:
Select the building to which this warehouse is associated from the dropdown box.
No Inventory?
If you don’t want to use the inventory component of the Work Order Module, set up one inventory type, and as many category info codes as you require to describe how the materials are used. In setting up the Category Info codes, use the same G/L account # for the Asset and the Cost accounts, but in fact, the system shouldn’t use them at all. When you enter a work order, select the product item “Non Inventory Items”, and you will be prompted to provide details. Your work orders will then allow you to sell materials without any effect on the G/L Inventory.
Inventory Types
(Supplier – Work Order – Maintenance Control Codes)
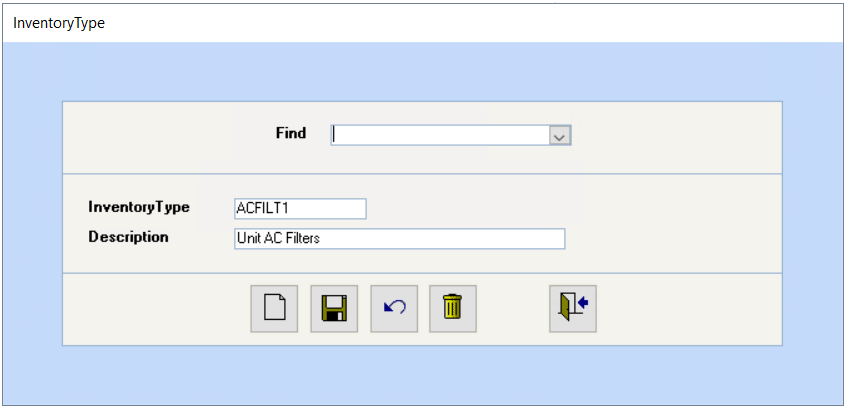
General Discussion:
All of your inventory will be assigned Product ID’s, which will be grouped together within Inventory Categories, which will be grouped within Inventory Types. Therefore, you should have relatively few Inventory Types. The following example is offered to help you understand this concept.
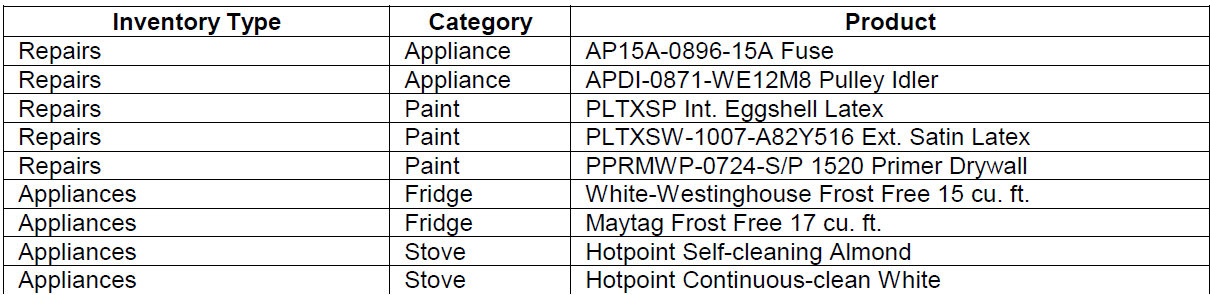
Inventory Type:
Enter a code of up to 10 characters. Inventory reports subtotal by Inventory Type, so keep this in mind when setting up your Inventory Types.
Description:
Enter a description of up to 50 characters. Examples might be “Repairs” and “Appliances”. Later in this manual, you will see that we also set up a Non-Inventory type of Inventory to account for Sales Tax to be charged to a separate General Ledger account.
Product Useage Codes
Maintenance Control Codes
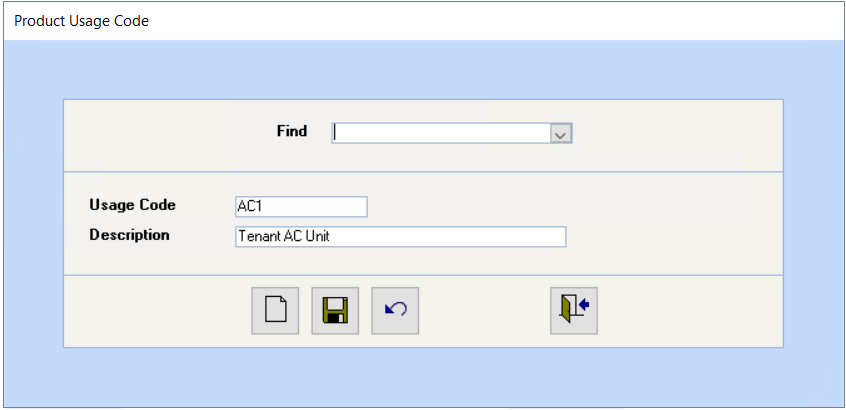
You should set up a code for general use, and then specific codes to identify products with limited uses. E.g. Product “XYZ Filters” for use with airconditioning units, you could set up a usage code called “AC1” and a description of “Tenant AC Unit”.
Usage Code:
Enter a code of up to 10 characters.
Description:
This description field may be up to 50 characters.
Technicians
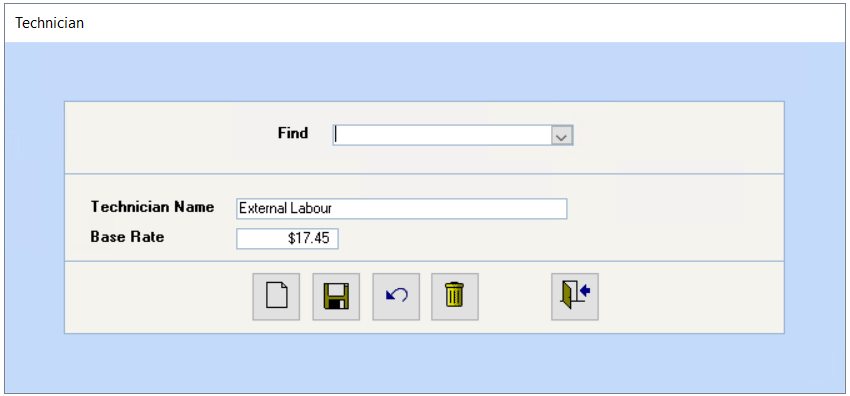
Technician Name
Enter your work order personnel by name.
Base Rate:
Enter each technician and the hourly rate at which he is charged out. This rate will be applied to any job this technician is sent on. The Overhead rates entered on the Maintenance Department Configuration will be applied after this rate.
i.e. If the base rate is $15.00 and the Overhead Tenant percentage is 25%, then any tenant will be charged $15.00 + 25% = $18.75 per hour for this technician. If the Overhead Direct percentage is 10%, then this same technician will be charged within the company at $15.00 + 10% = $16.50.
An “External Labor” code is supplied with your system for you to charge labor costs from outside contractors. As the rate will vary by contractor, the rate for this external labor should be left as $0.00 and the actual hourly rate entered in the Work Order itself.
Helpful Hint:
If a technician has different rates determined by the job done, set up a separate “technician” for each rate: e.g. Pat – Painting @ $25.00, Pat – Carpentry @ $35.00
Report:
To print a report of all codes set up on this particular Maintenance Control Code, go to the Supplier – Reports – Work Order – Maintenance Control Code Listings.
Work Order Activity Codes (Labor Costs)
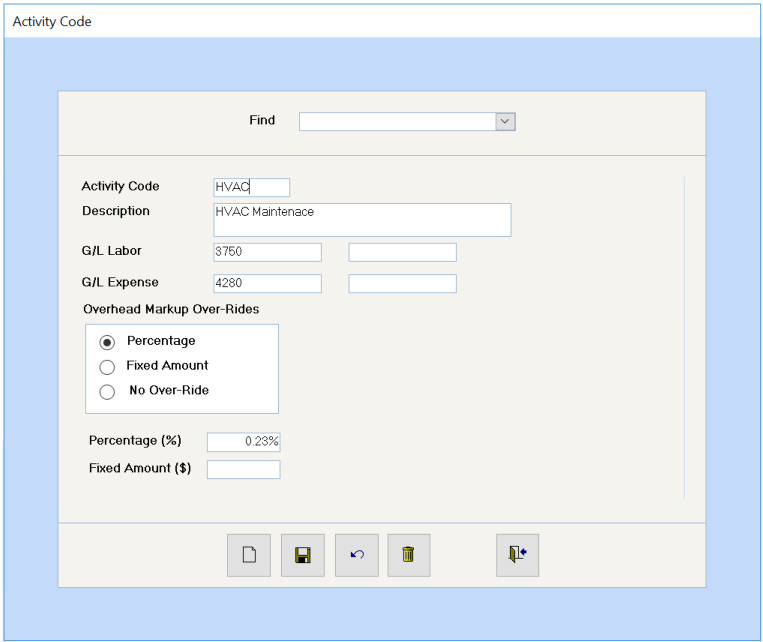
These codes will determine to what accounts the Work Order labor will be posted.
Activity Code
Enter a code of up to 10 digits, e.g. Lights, HVAC, and Plumbing.
Description:
Enter a description of this activity code, which will print on the customer’s invoice. E.g. Replace light bulbs, Service HVAC unit, Paint unit, etc.
G/L Labor:
Enter the G/L account number for Work Order Labor revenue in the first box. The system will use this account number to record the labor revenue in the Maintenance Department. The second box on each line is for the G/L sub account, if it exists.
G/L Expense:
If a tenant is not to be billed for this work, then the system needs to know what account to charge to offset the revenue recorded in the G/L Labor account. Enter the G/L account number for Work Order Labor expense in the buildings for which this work is done.
e.g. If a work order is done to service the HVAC system, and the tenant is not to be charged, the maintenance department will record the revenue, and the building will need to record this expense, so you would enter account 4280 – R&M – H.V.A.C, if using the supplied chart of accounts.
Report:
To print a report of all codes set up on this particular Maintenance Control Code, go to the Supplier – Report – Work Order – Maintenance Control Code Listings.
Work Order Category Codes
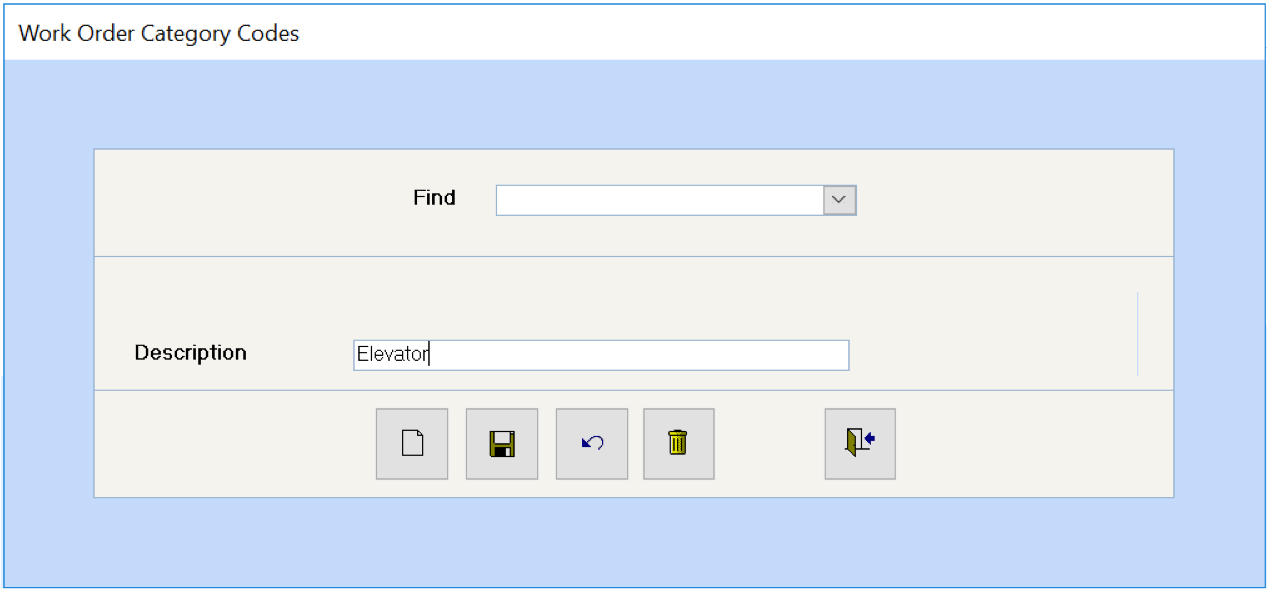
The Work Order Category prints on the customer’s invoice, and you must set up at least one Category code.
Each work order is assigned a general category, whereas each work order may have several work order activity codes. You may choose to set up a “General Work Order” for those work orders that are difficult to define.
E.g.: A work order with a category of “Suite Renovation” may have several different activity codes assigned to it, e.g. plumbing, carpentry, drywall repairs, painting, carpeting, etc.
Person In Charge
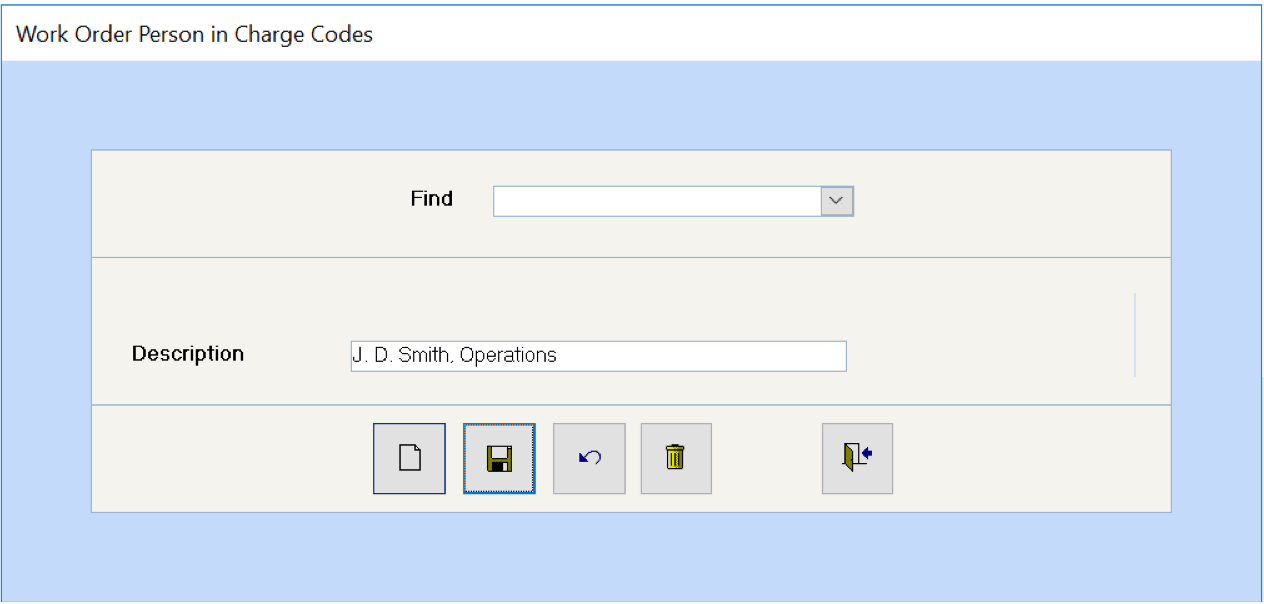
Enter the names of your management personnel, so that each work order can be assigned to be under someone’s direction.
Work Order Status Codes
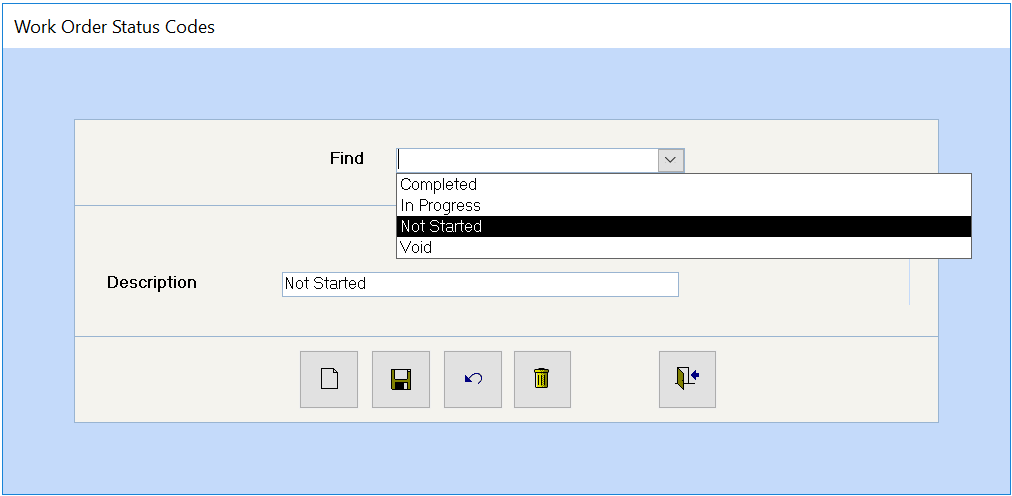
The system comes with some pre-defined codes, namely Not Started, Completed, In Progress, Void. You may choose to add others, such as New, Assigned, To Be Redone.
Work Order Type Codes

You decide how you want to use the Work Order Type Code, as this code is simply another means of identifying work orders for report selection purposes.
Examples of Work Order Type Codes:
General
Preventative Mtce
Tenant Request
Landlord Request
Annual Service
Allow Work Orders of this type to be Rescheduled?
Select this option if you want the system to prompt you to reschedule recurring work orders.
Purchase Order Status Codes
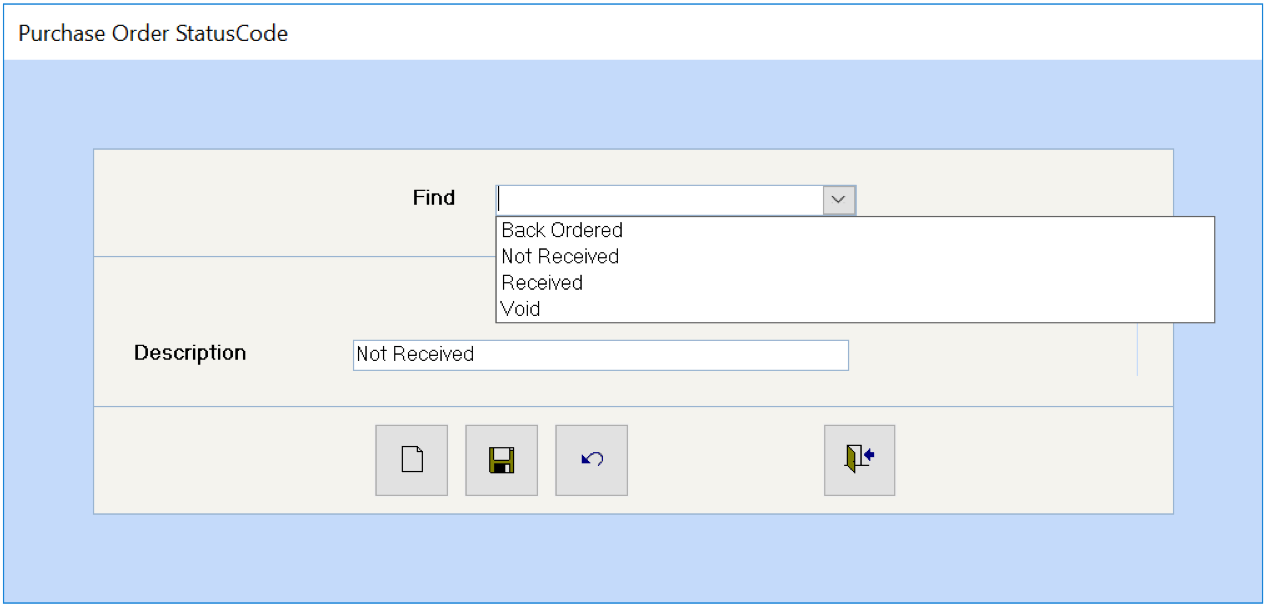
The system comes with some pre-defined codes, namely Not Received, Received, Back Ordered, and Void.
These codes are used in the selection process when printing Purchase Orders.
Category Info (Material Costs)
(Supplier – Purchase Order – Category Info)
All products are grouped within Categories, and inventory reports are available by Category. Please refer back to the examples shown under Inventory Types on Page 13.
You will probably want to set up similar codes to the ones you set up for the Work Order Activity codes. The WO Activity codes handle the posting of the labor component of the work order, whereas the Category Info handles the posting of the materials component of the work order.
When you first access this menu item, you will see the Category Criteria screen. Enter a specific category ID or name and then click on OK to access that category or click on OK or hit
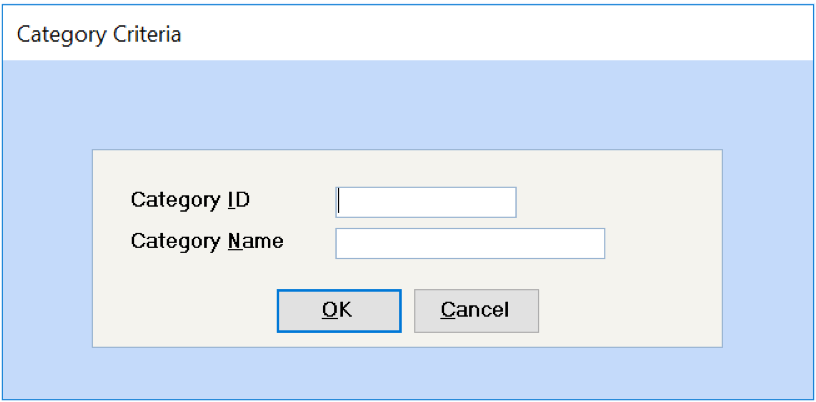
If you have not added any categories, the screen will be “Add Category”, and you can proceed to add your first category. If you have added categories, you will automatically be at the first category. Use the Right arrow on the toolbar to scroll through all the categories you have set up. Click on the Add New Database Record button to add a new category.
Within each Inventory Type, you will have Categories. e.g. You might set up an Inventory Type called “General Repairs” and within that type, you could have several categories, e.g. Carpentry, Electrical, General, HVAC, Landscape, Painting, Plumbing, etc.
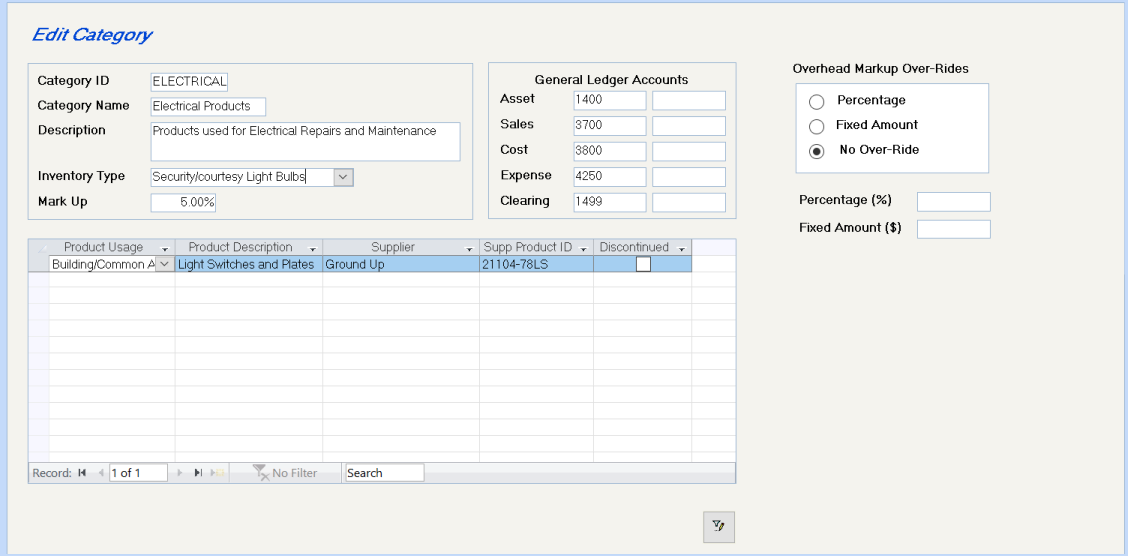
Enter an ID code of up to 10 characters, e.g. Carpentry, Electrical, HVAC, Landscape, etc.
Enter a category name of up to 20 characters, e.g. Carpentry Supplies, Electrical Supplies, Landscaping Materials, Paint Supplies, etc.
Enter a comprehensive description of what this category includes.
Select the Inventory Type in which this category belongs. e.g. Appliance Supplies might be in Inventory Type “Repairs”, whereas Appliances might be in the “Appliance” inventory type.
Enter the percentage of markup to be applied to materials taken out of inventory for work orders. When you receive new inventory, you have the option of calculating a new selling price based on the cost price and this Mark Up percentage. This assumes that you want a markup on your inventory before the overhead markup recorded on the Maintenance Configuration File. E.g.
Category Info screen: 10%
Maintenance Configuration File:
Direct Overhead (to buildings) 15%
Tenant Overhead 25%
If a product costs you $50.00, the system will calculate the selling price, as follows:
Buildings: $50.00 + 10% + 15% = $ 63.25
Tenants: $50.00 + 10% + 25% = $ 68.75
If you want your overhead to apply to your actual cost, enter 0% as the Category mark up.
Asset: Enter the inventory asset account from which this inventory will be taken.
Sales: Enter the revenue account where the inventory sold plus the markup will be recorded
Cost: Enter the revenue/expense account where the cost of sale will be recorded (inventory value alone). The Sales accounts less the Cost accounts will give you your Gross Profit.
Expense: If this material will be used for internal work orders, i.e. no tenant will be billed for the inventory, then the system will need to know to which account to expense this inventory, e.g. R&M-Painting, R&MHVAC, etc.
Clearing: Enter the Inventory Clearing Account, which will be used when inventory is used for a different building than the warehouse that the inventory came from.
These fields will be filled in as you add Product Info.
If you don’t want to use the inventory component of the Work Order Module, use the same G/L account number for the Asset and Cost accounts. You must still complete the fields in any case to prevent errors on the system.
To get a report on all Categories set up, go to the Supplier - Reports – Purchase Order – Category Master Listing.
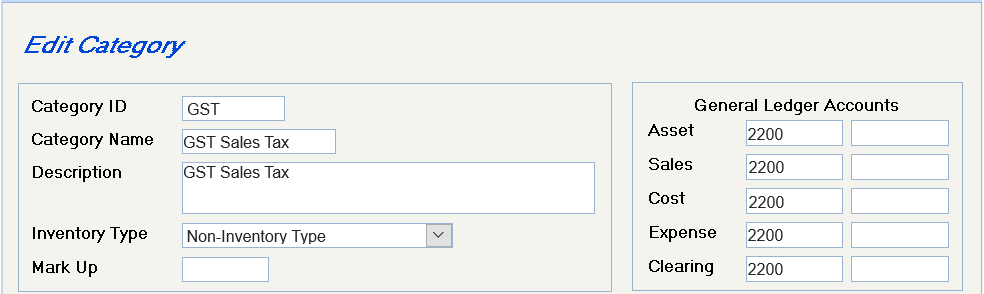
If you will be posting suppliers’ invoices in the Purchase Order Receipt program, and if you have a sales tax that should not be added to the cost of the products, such as Canada’s Goods & Services Tax, set up a Category ID for the GST Input Tax Credit, so that the system will know where to post the GST portion of the supplier’s invoice.
Product Info
(Supplier > Purchase Order > Product Info)
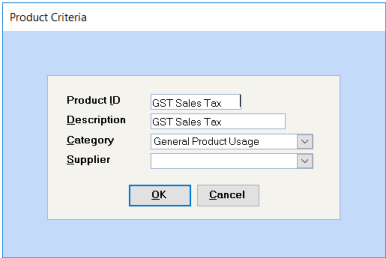
When you first access this menu item, you will see the Product Criteria screen. Enter a specific product ID,
Description, Category, or Supplier and then click on OK to view specific products or click on OK or hit
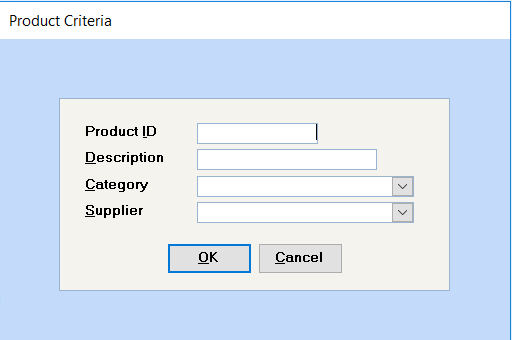
Click on the Add New Database Record button to add your first product.
If you have added products, you will automatically be at the first product. Use the Right arrow on the toolbar to scroll through all the products you have set up. Click on the Add New Database Record button to add a new product.
Within each Inventory Type, you will have Categories, and within each Category, you will have Products. e.g. You might set up an Inventory Type called “Repairs & Maintenance” and within that type, you could have several categories, e.g. Appliance Supplies, Carpet Clean Supplies, Electrical Supplies, Paint Supplies, Plumbing Supplies, Tools, etc. Within Appliance Supplies, you could have products consisting of several types of fuses, elements, switches, pumps, belts, etc.
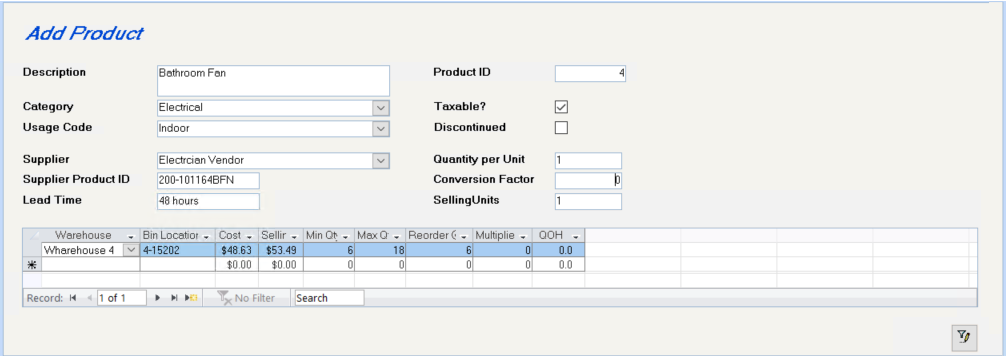
The system will automatically assign a product number.
Enter a comprehensive description beginning with a part number or something that clearly identifies this product.
Select the category that this product belongs in (from Work Order Categories).
Select the Usage code for this product (from Product Usage codes)
Select the preferred supplier from whom you normally purchase this product, which will be used by the Inventory Re-order Report. When you set up purchase orders, you are able to order this product from other suppliers, if you wish.
Enter the preferred supplier’s Product ID for this particular product.
If it normally takes 3 weeks to get this product in, enter 21 days
If this item is subject to any sales taxes on resale, tick this box.
Marking a product as discontinued will cause this product not to be displayed on some combo boxes.
Marking a product as discontinued will cause this product not to be displayed on some combo boxes.
Enter the unit that this product is purchased in, e.g. gross, case, dozen, etc. This is an alpha-numeric field.
If you can only buy a product by the gross (144), but you resell it individually, then the conversion factor is: the quantity per unit / the # per sale or 144/1 = 144.
Enter how you sell the product, which will normally be “each”. This is an alphanumeric field.
The following fields are only required if you want to set up Minimum/Maximum quantities and reordering information. When you receive inventory, you will be prompted for warehouse and the Purchase Receipt program allows you to calculate a selling price.
Select the warehouse where this stock is to be located.
This optional field will assist you at stocktaking time, as inventory count sheets are printed by bin number.
Enter the landed cost of each selling unit. Remember that if you are not using the inventory component of this module, you must leave the cost of Work Order Materials at zero.
Enter the selling price of each selling unit. You need to enter the selling price initially, but thereafter, when inventory is received, you have the option of having the system calculate the selling price based on the cost price and the mark up percentage entered on the Inventory Category (see Category Info). This selling price forms the base amount on which any overhead is calculated.
i.e. An item has a cost price of $20.00 and you enter a selling price of $30.00. The Overhead Tenant is 25% and the Overhead Direct is 10% (from the Maintenance Department Configuration), then tenants will be charged $30.00 + 25% = $37.50 and buildings will be charged $30.00 + 10% = $33.00 for this item.
Enter the minimum number of selling units that your inventory should never fall below.
Enter the maximum quantity of selling units that you ever want to have on hand.
Enter a Reorder @ quantity for the Inventory Re-Order Report. E.g. If you estimate that you will sell 5 selling units a week, and it takes 3 weeks to get the product in, and you want to maintain a minimum quantity of 10 on hand, your reorder point would be when your existing stock falls below 25 (10 + (3 x 5))
Having arrived at a Reorder Point, how many do you want to order? The multiplier is used with the Conversion Factor to arrive at the number to be re-ordered. In the above example, if this item is normally purchased by the dozen, and you want to order 4 weeks supply (4 x 5 = 20), then your Multiplier would be 2. (The Conversion factor would be 12 and, therefore, 20/12 = 1.66 or 2.)
Note: On the Inventory Re-Order Report, this will show in the column headed “Rx” and indicates what you should order from your supplier, i.e. the number of cases, gross, or dozen, etc.
This number will be updated in one of the following ways:
• When you enter the opening inventory, using the Adjust Inventory program (Supplier – Work Order – Stock Count Process – Adjust Inventory).
• When you receive goods via Purchase Receipt.
• When you transfer inventory from one warehouse to another
• When you use inventory on a work order.
To get a report on all Products set up, go to the Supplier - Reports – Purchase Order – Product Master Listing.
If you will be posting suppliers’ invoices in the Purchase Order Receipt program, and if you have a sales tax that should not be added to the cost of the products, such as Canada’s Goods & Services Tax, set up a Product ID for the GST Input Tax Credit. Link it to a GST Sales Tax category, so that the system will know where to post the GST portion of the invoice.
Every product must have a supplier be connected to it, so select any supplier. It doesn’t matter which supplier is selected, as this will not affect your use of this “product” code.
Enter Existing Inventory
(Supplier – Work Order – Stock Count Processing – Adjust Inventory.)
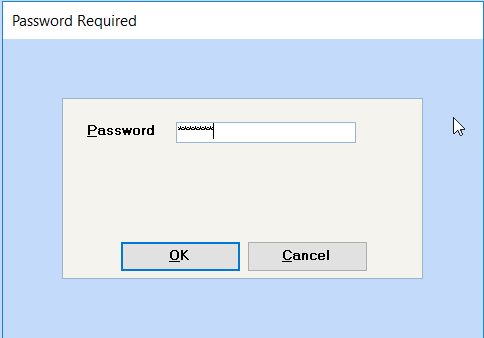
The simplest way to enter the opening inventory is to use the Adjust Inventory program.
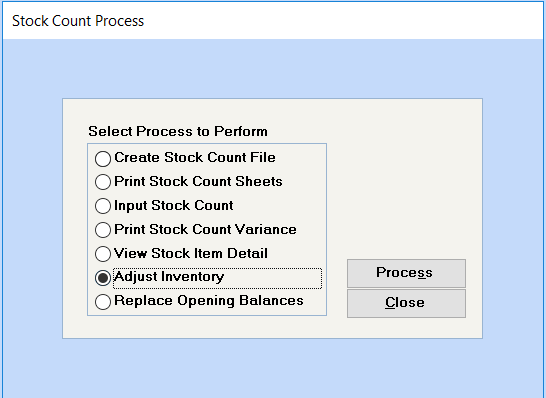
This process is password protected. Enter the supplied password “Spectra” and then click on OK to proceed to the Inventory Adjustment screen. At the bottom of that screen, you will see a button “New Password” to allow you to set up your own password to control inventory adjustments.
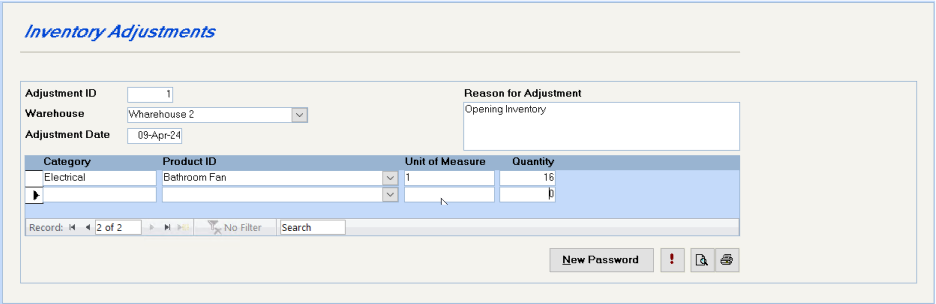
This screen is self-explanatory for the most part. The system automatically assigns an adjustment number. Selecting the Product ID from the drop down list will automatically fill in the Category field. Enter the quantity for each item selected.
Once you have entered the inventory, click on the "!" button to process these adjustments. This will update your Work Order/Maintenance Inventory, but will not affect your G/L in any way.
Add another inventory adjustment to make additional changes to the inventory.
Did you remember to change the password from “Spectra”? This is very important as anyone can change the inventory with this password, and it would be very difficult to find this adjustment later.
Click on the Preview or Print buttons to see the current changes to the inventory.
To confirm what has been entered on the system after all inventory postings, go to the Supplier – Reports – Work Order – Inventory Stock Status.
Enter New Inventory
Purchase Order:
(Supplier – Purchase Order – Purchase Order)
All Inventory coming in is handled by purchase orders. You must enter a purchase order, so that you can then “receive” the items ordered on the purchase order.
When you first access this menu item, you will see the Purchase Order Selection Criteria screen. The default is to show you Unposted Purchase Orders. If you want to see a specific Purchase Order #, changed to All, and enter the Purchase Order #, Supplier ID, Work Order #, PO Date range, or PO Status Code and then click on OK to access that group of Purchase Orders.
If you have not added any purchase orders, click on the Posted Status of “ALL”, and then click on the Add New Database Record button on the Toolbar to add a new purchase order.
If you accept the default of Unposted and click on OK or hit
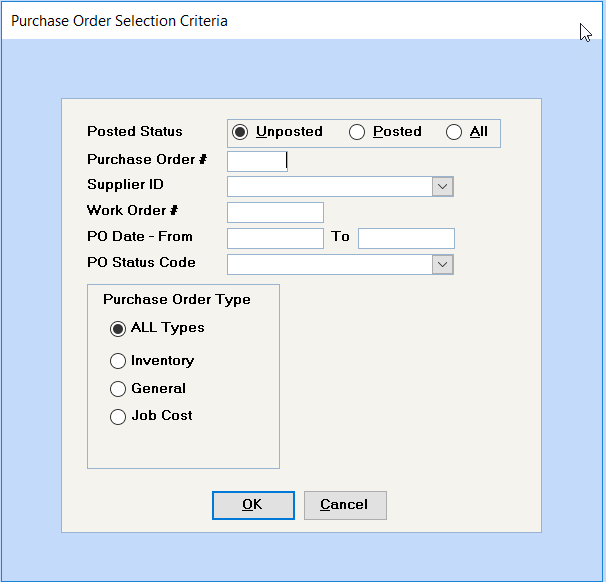
If you have added purchase orders, you will automatically be at the first purchase order. Use the Right arrow on the toolbar to scroll through all the purchase orders you have set up. Click on the Add New Database Record button to add a new purchase order.
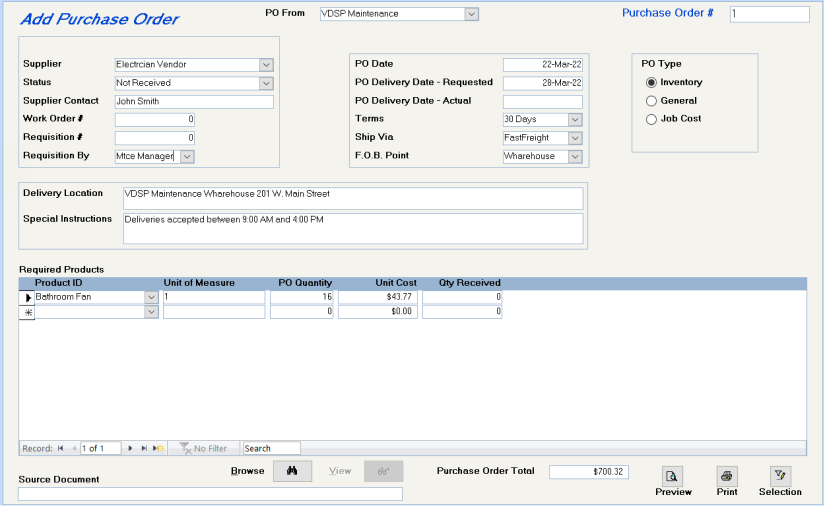
The name will default to the name in the Maintenance Configuration File. If the name you want printed on the P.O. is different, it can be selected here. To add a new name type in the name and, when prompted to add to list, say Yes to enter additional information.
The system automatically assigns a purchase order number.
If you are continuing the purchase orders from another system and want to start with a purchase order number other than #1, set the starting purchase order number with assistance from Spectra Support. You will be directed to the System Tasks – Spectra Utilities – Reset Order Numbers. This password-protected feature will enable you to set the starting numbers for Work Orders and Purchase Orders.
Select the supplier from the dropdown box. The Supplier name will be repeated for as many contact names as are shown on the supplier. Select the supplier name with the Supplier contact name that you want, if the contact name is available.
Enter the current status of the purchase order.
Optional field. This field is automatically filled in when you select the Supplier name, or you can override it and key in a contact name directly.
If these materials are being ordered for a specific work order, enter the work order number.
If requisitions are submitted to initiate purchase orders, enter the requisition number here.
Select a name from the drop down box, or type a new name into the field provided and add it to the list when prompted.
The system automatically defaults to today’s date, but you can override this date and enter another date.
Optional field
You shouldn’t enter this date until you have taken receipt of the inventory and you are updating the Purchase Receipt.
Enter the Supplier’s payment terms. Double click in this field to enter a new option.
Enter the method of shipment. Double click in this field to enter a new option.
Enter the location from which you pay the shipping costs. If delivery is “free”, then you may select the F.O.B. Point as the Warehouse. Double click in this field to enter a new option.
The Work Order modules allows access to Inventory only.
Enter these fields, which will print on the purchase order.
If you select this option, you may select a building address from the Pick Delivery Location dropdown box. This will give you a listing of your buildings from which to choose, which will then print in the delivery location box. This can be overwritten if you change your mind.
Required Products:
Select the product from the products already set up. If the product does not exist, you must close this purchase order, add the product in the Product Info screen, and return to the purchase order to complete it. All products will display, because you are not limited to the supplier of choice entered on the Product Info screen.
This will pick up the Quantity per Unit field on the Product Info screen, i.e. dozen, case, gross, etc. If the Product Info screen indicates that you order by the dozen and the Conversion Factor is 12 because you sell the product individually, then the quantity you order and the unit cost must be per dozen.
i.e. If you are purchasing an item for which you have set the product up with a Quantity per Unit of 12 or dozen and a Conversion Factor of 12, be careful what you enter as the PO Quantity. If you enter 36 of this item, the system will assume 36 dozen or 432 items, so if you want to order 36 individual items, enter 3, so the system will order 3 dozen.
Please refer to the discussion under Unit of Measure. Enter the number of units to be ordered. The system will multiply this number by the Conversion Factor to arrive at the number of Selling Units, when the items are received.
Enter the unit price, i.e. the price per case, dozen, or gross, if that is the unit that you are ordering from the supplier. Once you have received this product into the system, the system will default to the last unit cost entered on the system, which you can override with the current cost.
This field will be filled in when you complete the Purchase Receipt program.
When you have entered all the purchase order information, click on the Print Preview or Printer buttons to view and print or send the purchase order directly to the printer.
The Selection button will call up the Purchase Order Selection Criteria box to enable you to select another purchase order.
Purchase Reciept
(Supplier – Purchase Order – Purchase Receipt)
All Inventory coming in is handled by purchase orders. As you have already entered a purchase order, you can now "receive” the items ordered on the purchase order.
When you first access this menu item, you will see the Purchase Order Selection Criteria screen, which defaults to Unposted Purchase Orders. You may change the status to All, and enter a specific Purchase Order #, Supplier ID, Work Order #, PO Date range, or PO Status Code and then click on OK to access that group of Purchase Orders.
If you accept the default of Unposted and click on OK or hit
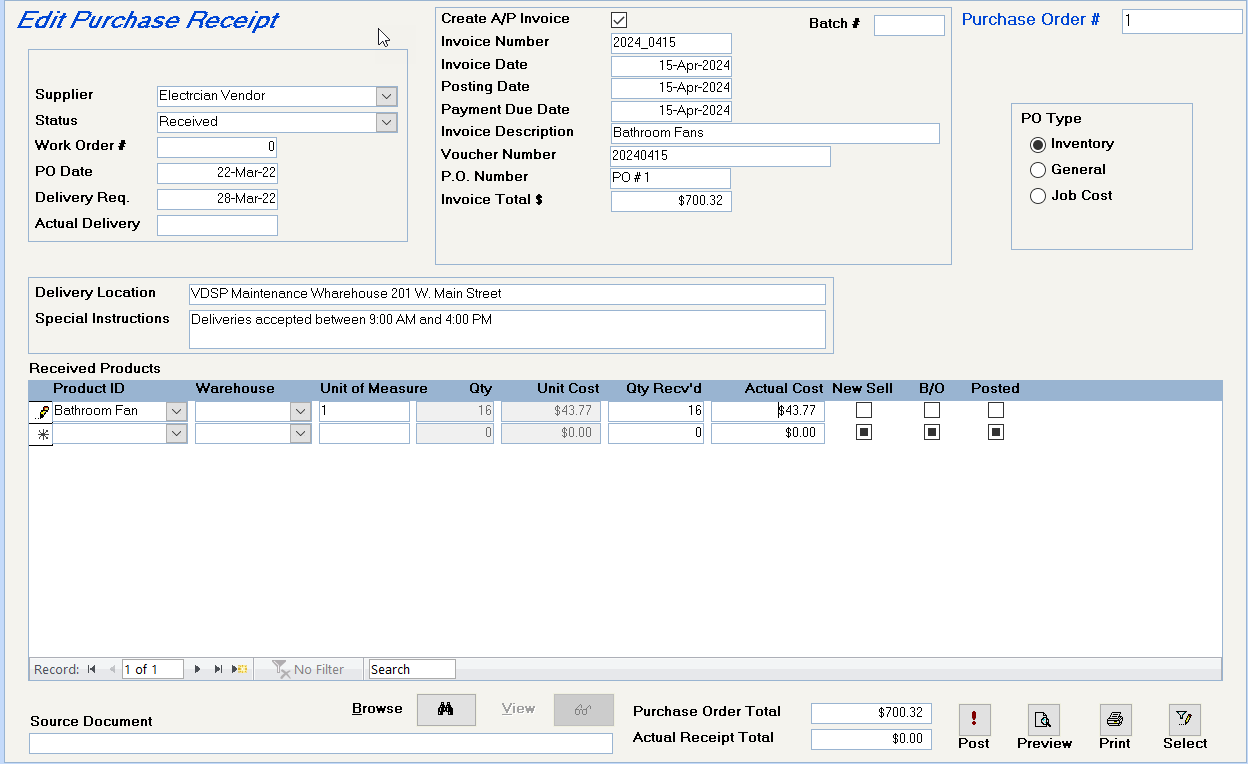
Change the status to Received or another code, if it has only been partly received.
Enter the actual date the inventory is received
Enter the Supplier’s invoice details and the total amount of the invoice, including all shipping and taxes. Be sure to select the option “Create A/P Invoice”, if you want the system to set the supplier’s invoice up in the Accounts Payable.
This Invoice Total must match the Actual Receipt Total before the system will let you post the Purchase Receipt. Therefore, any shipping costs and sales tax must be distributed among the actual costs of the products or added as a separate product ID with a quantity of 1 and dollar amount.
If items are back ordered and subsequently received, you will not be able to use the Create A/P Invoice feature for the second invoice. Enter subsequent invoices for this purchase order under Supplier – Invoices – Supplier Invoice Batch Entry.
Select the warehouse where this inventory is stored.
Enter the number of units received and the actual cost. When you click on the Post Purchase Receipt button, the system will add the number received to the current inventory and back order the non-shipped amount.
If you don’t want the balance back ordered, untick this box before you click on the Post Purchase Receipt button.
If you want the system to calculate a new selling price, based on the latest actual cost, click on this field to enter a checkmark.
If the purchase order wasn’t completely received, the system will automatically set up a back order. If you don’t want the balance back ordered, untick this box before you click on the Post Purchase Receipt button.
As the purchase receipt is linked to the original invoice received, when subsequent items on this purchase order are received, you will not be able to use the Create A/P Invoice feature for subsequent invoices for this purchase order. These invoices are to be entered under Supplier – Invoices – Supplier Invoice Batch Entry.
Click on this button to update the inventory and create back orders.
Click on these buttons to preview or print a copy of the Purchase Receipt.
The Posted button will display when the purchase order receipt has been totally posted, and all items on the purchase order have been taken into inventory.
If only part of the purchase order has been received, the Posted button will not display, although the system will post the partial receipt if you click on the Post button.
Customer Work Order
(Supplier – Work Order – Customer Work Order)
When you first access this menu item, you will see the Customer Work Order Selection Criteria screen. The default is to show Unposted Work Orders, but you can change to All and enter a specific Work Order #, Tenant PO#, Building, Unit, etc. and then click on OK to view specific work orders.
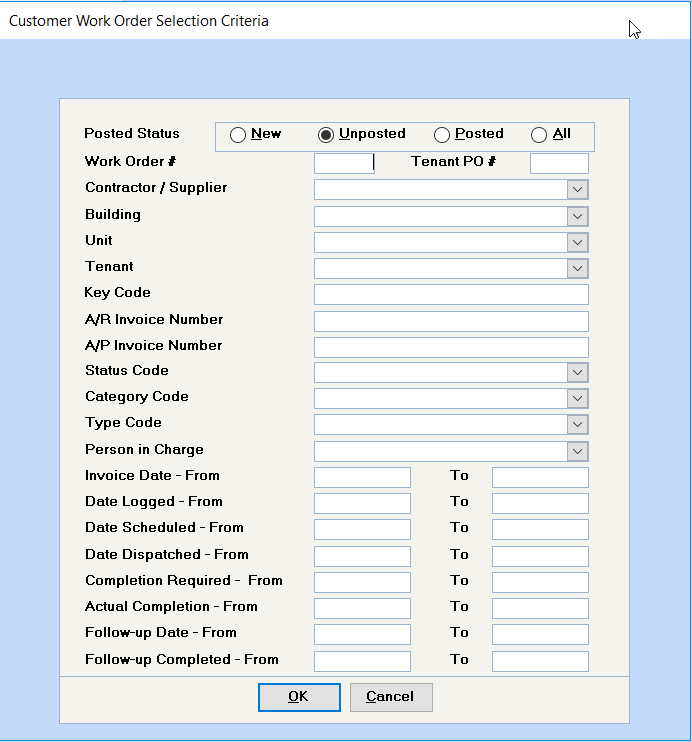
If you accept the default of Unposted and click on OK or hit
If you have added work orders, you will automatically be at the first unposted work order. Use the Right arrow on the toolbar to scroll through all the work orders you have set up. Click on the Add New Database Record button to add a new work order immediately.
Work Order – Header Screen:
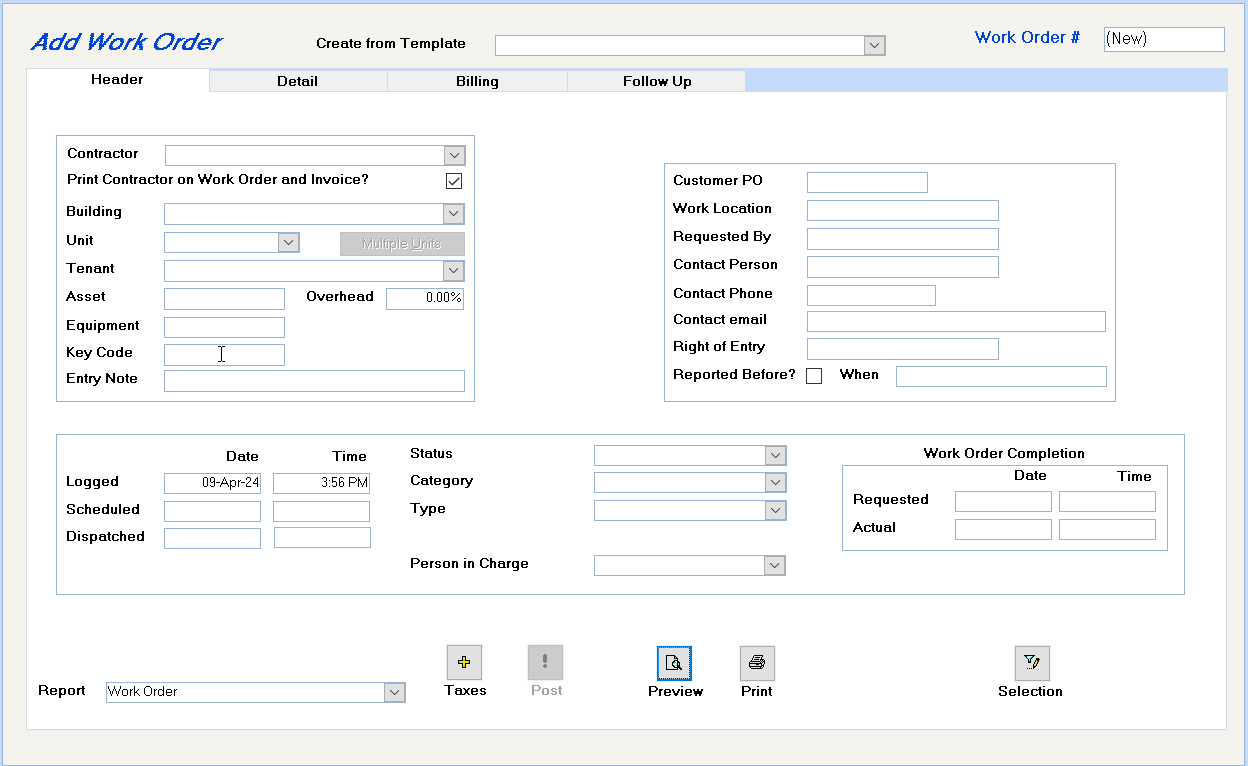
See next heading for creating a work order template.
The work order number is automatically assigned by the system.
If you are continuing the work orders from another system and want to start with a work order number other than #1, you can set the starting work order number with assistance from Spectra Support. You will be directed to the Database Menu – Spectra Utilities – Reset Order Numbers. This password-protected feature will enable you to set the starting numbers for Work Orders and Purchase Orders.
Enter a supplier’s name, if this work order is to be contracted out. Important: Leave this field blank, if your own personnel will be doing the work.
Select the building and unit number from the dropdown buttons.
You may assign work orders to more than one unit and distribute specific amounts to the units in the Maintenance History.
Instead of selecting a specific unit, click on the Multiple Units button. This will call up a list of units for this building. Select the units involved and close the form.
You may enter the tenant’s name, if applicable. This field does not indicate that the tenant will be billed. That will come later on the Billing screen. Your list will include existing contact names, and whichever line you select will complete the contact name and phone number.
Optional field. You may use this field to enter an asset reference number.
This field will default to the Overhead Direct (from the Maintenance Department Configuration) when the Building is selected, and it will change to the Overhead Tenant value if you select a Tenant. If you will not be billing the tenant and want the Overhead Direct percentage, you can override the percentage shown with any value you wish.
Optional field. You may use this field to enter an equipment reference number.
This 10-digit alpha-numeric code is used part of a key management function. All keys are coded so that if a key is lost, the finder cannot tell to which unit it belongs.
The Key Code is entered on the Unit file and is printed on each work order, enabling:
• The key to be properly pulled from the key files.
• The use of a third-party product, e.g. Excel or Crystal Reports®, to be used to extract this information from the Unit file to write a report listing all keys for a building or property.
• The individual lookup of a key code to pull a key for a tenant who is locked out.
This 50-digit alpha-numeric code allows any technician to know if there are special entry circumstances, e.g. Pets, Alarms, etc.
Optional field. You may use this field to record the customer’s purchase order number.
Enter up to 50 characters to specify the exact location of the work to be done.
Optional field. Enter the name of the person who initiated the work order request.
These fields will have been completed if the contact names existed on the tenant’s file. You may override the default name to any other contact person on site.
Optional field of 50 characters. Use this field to let the technician know when he can enter the premises to do the work required. Enter any specific instructions, such as “Work may be started at 8:00 a.m., and must be completed by 10:00 a.m.”
Logged: The current date and time is automatically entered in this field.
Scheduled: Enter the scheduled date for this work order to be done.
Dispatched: Enter the date and time that the technician is actually sent.
Enter the current status of this work order. The supplied codes are Not Started, Completed, In Progress, but you may have added other codes.
Select a category code from the available list. Each work order must be assigned a category code, e.g. Suite Renovation.
Select a type code from the available list. As a reminder, it is another means of identifying work orders for report selection purposes.
This option only appears if the Type field above has the “Allow Work Orders of this Type to be Reschedule” field flagged. This should only be used for Building, not Tenant, work orders. The following options are available:
Select the name of the department manager in charge of this work order.
Requested: The Scheduled date is automatically inserted in this field. you can override it.
Actual: This field will be updated from the Billing screen, where you can enter the actual date and time of completion. When the work order is complete, you will at that time revise the detail screen with actual , complete the billing screen, print the invoice, and post the work order.
It’s always a good idea to click on the Save button before proceeding. Click on the Detail tab to enter the details of the work order.
Work Order Template
To create a Work Order template, when you Add a new work order, double click in the “Create from Template” field will appear at the top of the screen.
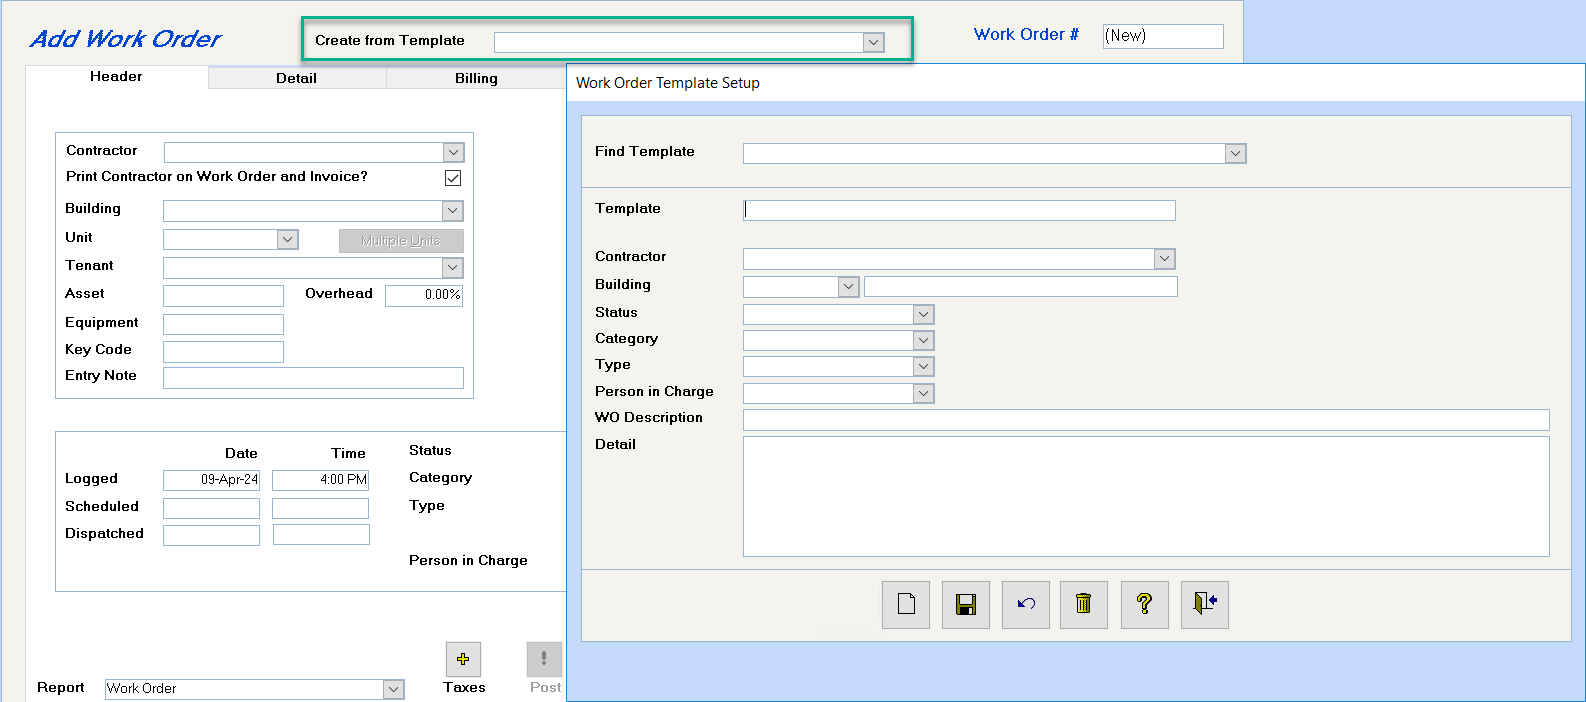
This screen shows the fields that will be filled in automatically with this template. The Building could have been selected, but wasn’t, as this particular template will be used for all buildings.
Save and click on the Add New Record to add additional templates.
When adding a new work order, select the template from the “Create from Template” dropdown and all the fields shown in the template will be automatically inserted in the work order.
Work Order - Detail Screen
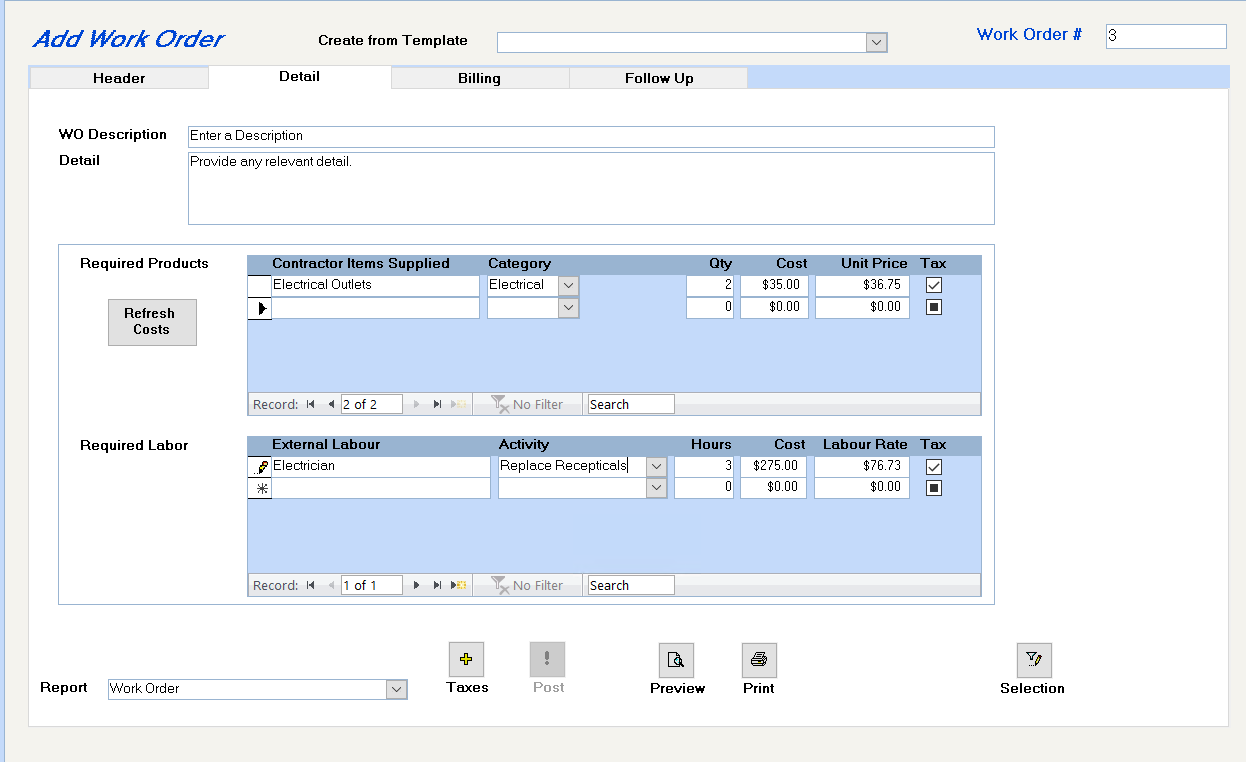
Enter a brief description (up to 50 characters) of the work to be done to print on the work order and the customer’s invoice. This description will print in the Tenant’s A/R and in the G/L, when the work order has been posted.
Enter complete details of the work to be performed, which will print on the work order and the customer’s invoice. Press
Select the products to be removed from inventory and the warehouse they are currently stored in. If an outside contractor is doing the work and the materials are not in inventory, you will not be prompted for the warehouse.
Enter the quantity required, and the system will calculate the unit price based on the product’s selling price and the overhead to be applied. This price can be overridden, if needed. Whether a product is taxable or not is entered on the Product Info screen. The tax setting can be overridden on this work order too.
If this is a recurring work order, the screen will reflect the costs from the previous work order. Click on the “Refresh Costs” button to update this work order to the current product costs. This option is not available if an outside contractor has been used.
If you select Non-Inventory Items, you will be prompted for a description of the product and a Category to enable the system to know how to post the entries. Non-inventory items will not be taken out of inventory or posted to Cost of Sales (because they have or will be expensed directly), but the system will need to know where to record the revenue and the expense if it is charged to a building.
Select the Technician and the Activity Code. Enter the number of hours in the Actual column. The Technician’s Labour Rate will display. Press the
Enter the technician’s name (if known) or the contractor’s name and select the Activity code, which will determine where the G/L account labor will be posted. Enter the number of hours and the Labor rate. If the labor is taxable when billed to the tenant or building, put a check in the Tax box.
Work Order - Billing Screen:
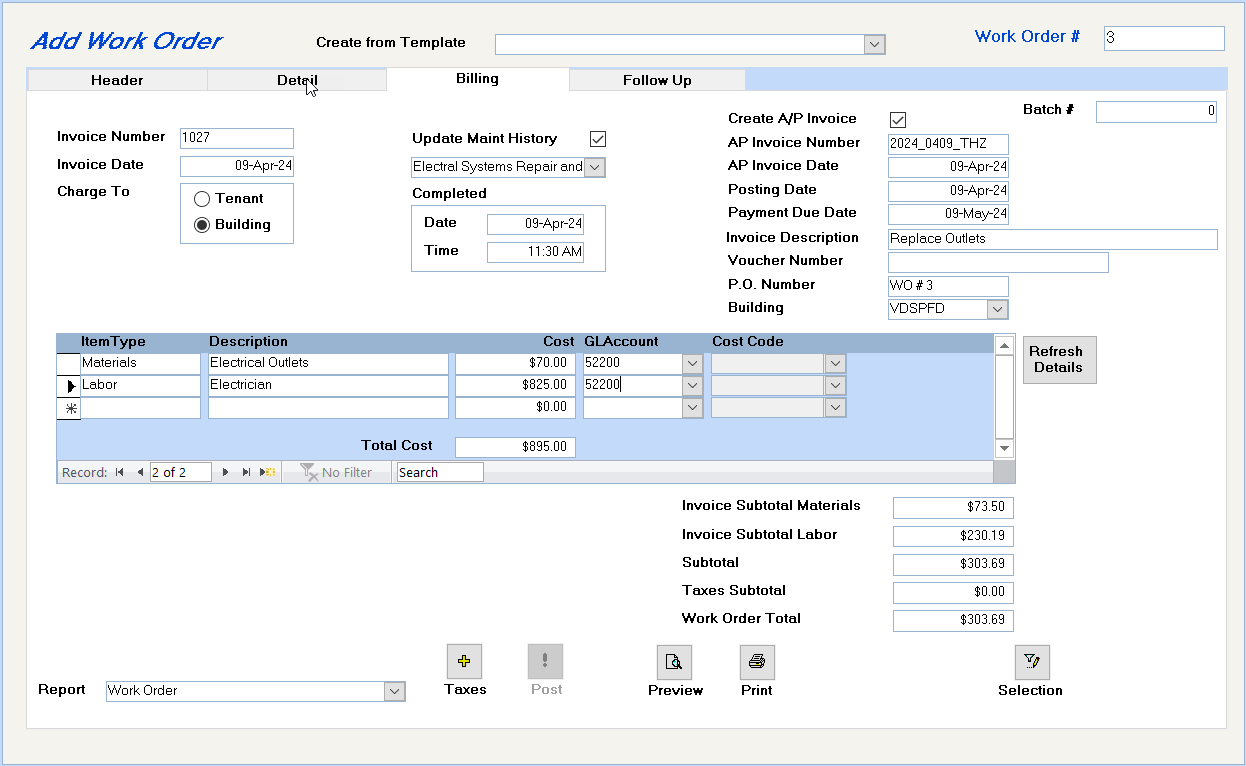
Double click to assign the next invoice number and the current date as the invoice date, or you can enter these fields manually.
Enter the date this work order is to be invoiced.
To bill a Tenant, the tenant must be selected on the Header tab. If you select Building, the system will charge the building for labor and inventory costs plus the Overhead Direct markup. To automate the payout of work orders charged to buildings to the maintenance department, please see the “Management Fees” section at the end of this document.
If the tenant is to be billed, should the tenant’s address be used, or the billing address. To set up a Tenant’s Billing Address, Open the Database from the Toolbar – Tenants – Search for and drill down on the Tenant – Addresses screen – Add – enter Billing name and address – Type – Select Tenant Billing – Save and Close the Window.
Enter the date (time optional) of completion here. This saves you going back to the Header screen. Entering the Completed date will prompt the system to display the rescheduling options if this work order has the Reschedule Frequency option set on the Header screen.
Entering the Completed date will prompt the system to display the rescheduling options if this work order has the Reschedule Frequency option set on the Header screen. When you click on the “Reschedule Work Order Now” button, the system will assign the next work order for Building work orders only (not Tenant work orders) and display the new work order number.
This option is available only before the work order is posted. You cannot reschedule a work order after it has been posted.
Optional field. If you select this field to update the maintenance history for this unit, you will be prompted for a preexisting maintenance code.
If you selected the “Multiple Units” option on the header screen, clicking on the “Update Maint History” button will enable you to distribute the costs to each unit.
Only the unit numbers selected on the Multiple Units screen will appear. Manually distribute the costs to each unit. When the work order is posted the Building – Maintenance History will be updated.
• To get the total after entering the last amount, click on the previous amount.
• The system assumes that you will distribute the cost before any sales taxes, but does not enforce this.
Click on this button to calculate all taxes.
If you make a mistake and shouldn’t have calculated taxes or if the tax calculation amount is wrong and you need to fix it, return to the Detail screen and untick all the Tax? fields. Click on the Calculate Taxes button again to zero out all the taxes.
If the tax calculation was wrong, find out what was wrong (probably a wrong percentage entered), fix it, come back to this work order, re-tick the Tax? fields, and click on the Calculate Taxes button.
The details of the materials, labour, and taxes will now display here.
At the time that the work order is complete and you are billing the building or tenant, you can also create the payable to the contract who did the work order, by selecting the option to “Create A/P Invoice”. Enter the supplier’s invoice number, and the invoice, posting, and payment due dates.
The contractor’s costs will be charged to the building shown, which defaults to the Profit Center building, if it exists.
Complete the G/L distribution of the suppliers invoice and adding any additional lines for sales tax or any other additional costs. The G/L Account number for the Supplier’s Accounts Payable Distribution should be the Cost of Sales General Ledger account number, 3800 in our example. This is true even if the building is to be charged, as the work order itself will charge the building based on the Work Order Activity Code G/L Expense account number.
When the work order is posted, go to Supplier – Invoices – Post Invoice Expenses to G/L to update the General Ledger with the Accounts Payable Distribution.
• Change the Report to “Invoice”
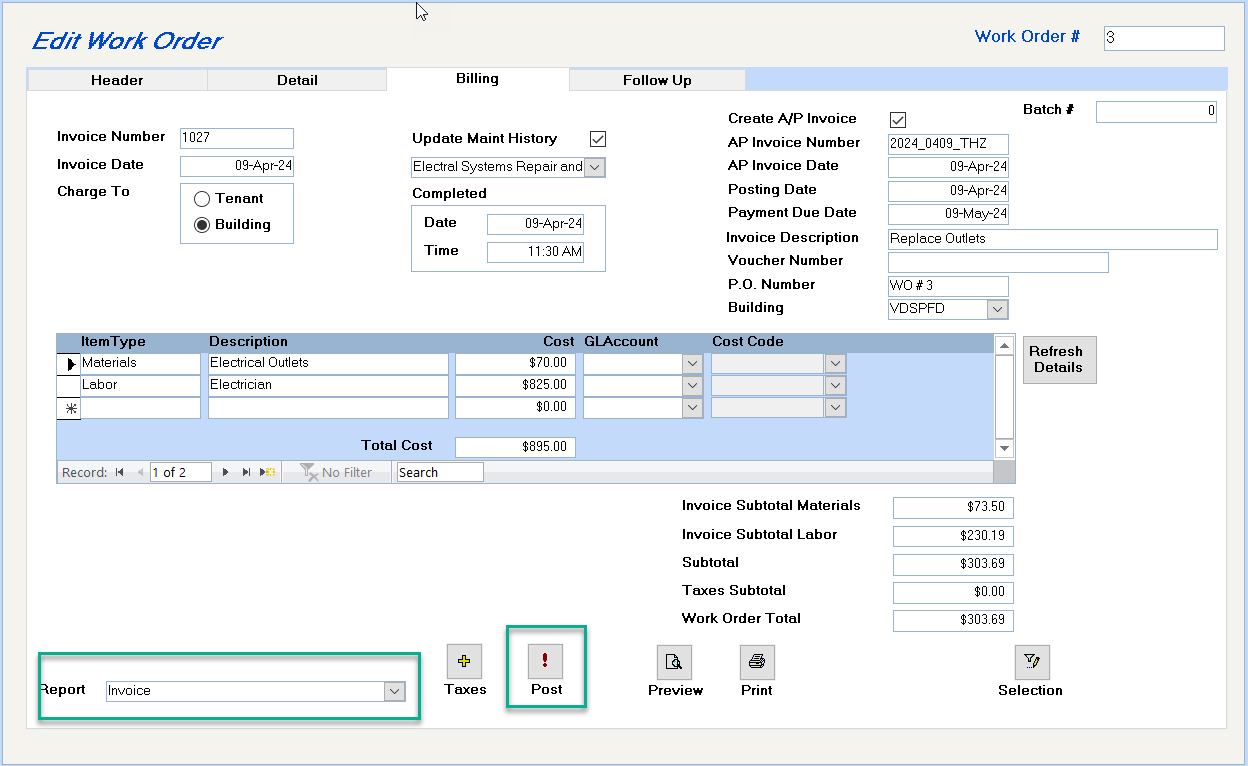
• Preview or Print the Invoice to the Tenant
• Click on the "!" button to post the work order. This will prepare the work order to update the receivables (if applicable), sales, cost of sales, expenses, etc and the payables, if you have selected the option to create a payable for the contractor. You must select the invoice to print before the completed work order can be posted.
• If you have other work orders to be entered or completed, click on the Save button, and Add New Database Record to add a work order or the Left/Right buttons on the toolbar to find an existing work order to be completed.
• Close the Window to exit the program, if you will not be entering anything on the follow-up screen.
• If you are using Accrual Accounting, go to Supplier – Invoices – Post Invoice Expenses to G/L to update the General Ledger with the Accounts Payable Distribution.
Work Order - Follow Up Screen
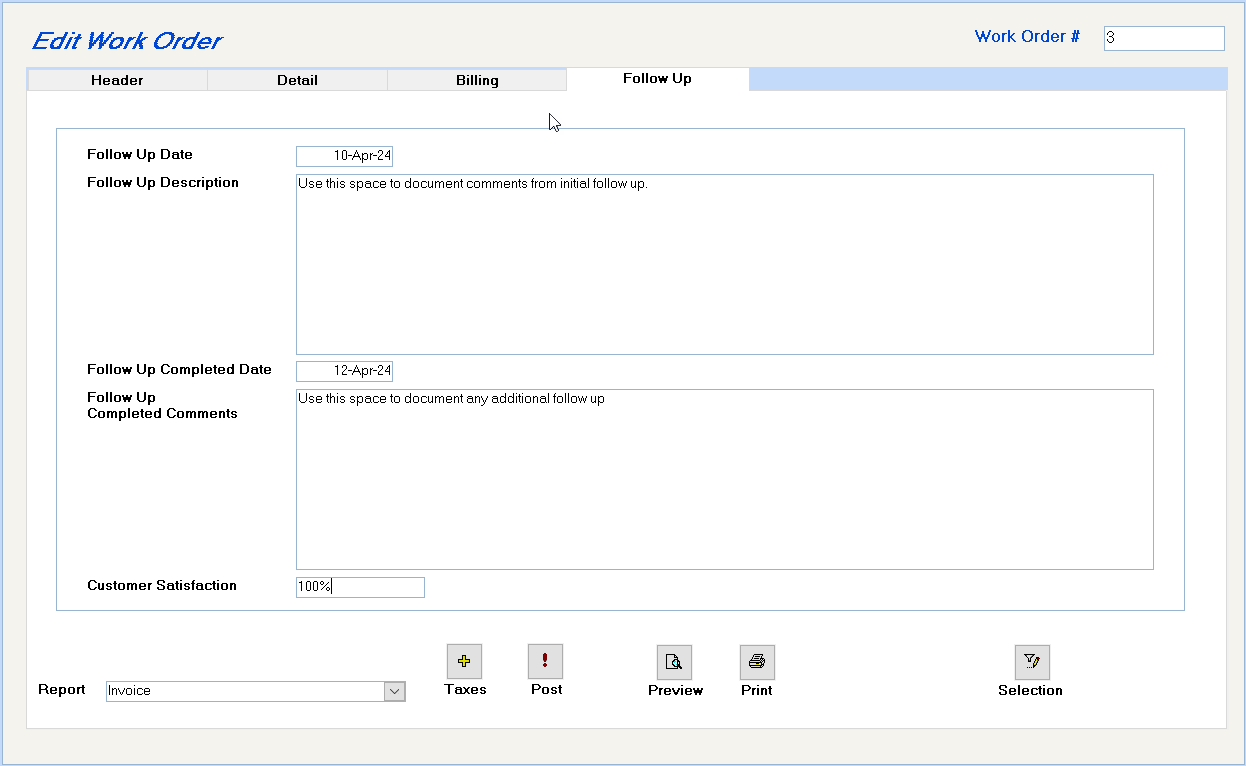
The information on this screen is optional.
If a follow-up visit is required for any reason, enter the specifics here. This information is stored for onscreen viewing only, and does not print on any reports or automated reminder system.
Enter the results of the follow up visit.
Enter up to 20 characters to record the customer’s satisfaction rating.
Overview of General Ledger Transaction Entries
MAINTENANCE DEPARTMENT SET UP AS A PROFIT CENTRE:

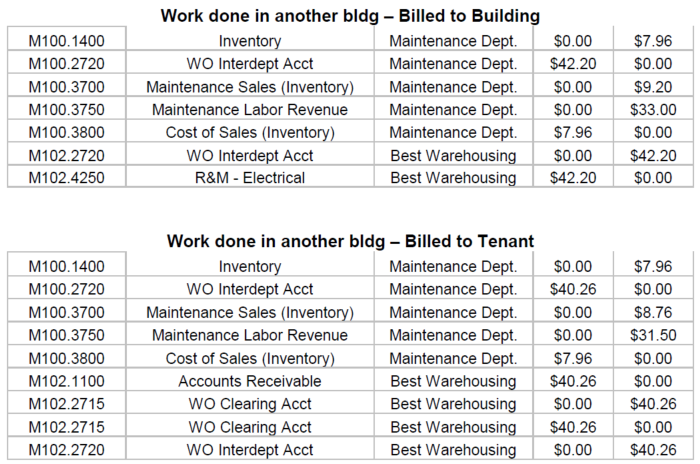
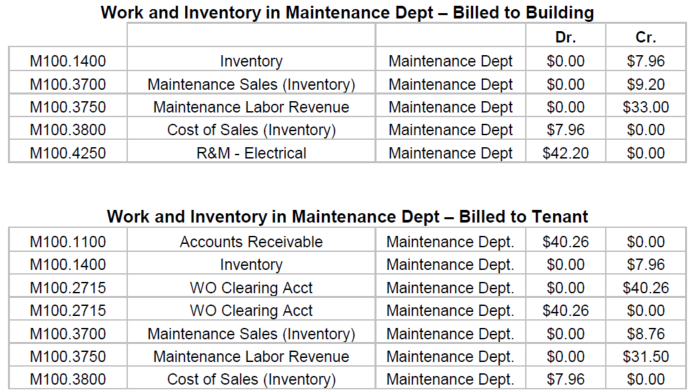
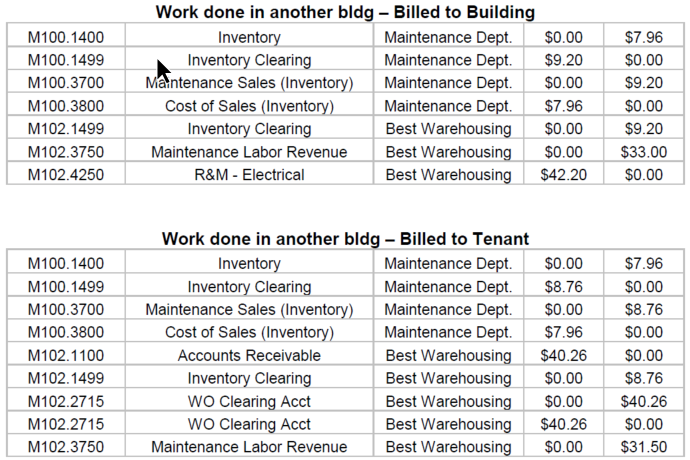
In these examples, the cost price of the inventory was $7.96 with a 5% markup on inventory. Overhead Tenant = 5%. Overhead Direct (Building) = 10%
TRANSFERRING WO REVENUE TO THE MAINTENANCE COMPANY
You may use the Management Fee program to automate the payout of work orders charged to buildings to the maintenance department, as on each building, the amount due to the maintenance department has been set up as a liability called Work Order Inderdept – 2720 in our examples.
If a supplier does not exist for the company to which the maintenance should be paid, set one up now using the instructions in the help files.
As the Management Fee will pay out any balance in 2720, you must set up another G/L account to record the payout, e.g. 2721 Paid to Maintenance Dept. Set this number up on one building, and then use the Copy Chart of Accounts Wizard to copy 2721 to all buildings.

Open the Database from the Toolbar – Buildings – double click in the Search for field to display all Buildings, and then drill down on each building – Accounting screen – add the Work Order Management Fee to each building.
As many times as you want during the month, you can then run the Management Fee Report to set up the payable to the Maintenance Department for the work order transactions in the month.
You may now select all invoices payable for the Maintenance Dept. and issue the check.